
13.37
Start up guide
2.1 Introduction 7
2.2 Installing Salix 10
2.3 Installing from a Live CD / USB 13
2.4 Installing from a Salix Installation CD 16
2.5 Installing from a Salix Installation USB 19
3 Your Salix 20
3.1 Package Management 20
3.2 Configuring Your Salix 24
3.3 Salix Tools 27
3.4 Salix Live Tools 32
4.1 Working with the Command Line Interface 36
4.2 Getting started with Salix Ratpoison 42
5.1 Advanced Boot Options 52
5.2 Linux Live Scripts 56
5.3 Personalising a Module 57
6 Support 60
7 Appendix 63
The purpose of this manual is to enable you to take full advantage of the many functionalities of Salix OS. The latest version of this document is available from our website.
Last updated on 7 October 2011 by tsuren
Your contribution is important!
We would like to improve the quality of the manual and to provide more documents translated in your mother tongue. Your help is always welcome.
For any comments and submission of articles to be included in the start up guide, please contact tsuren on the forum or write to:
salix-main@lists.sourceforge.net
Acknowledgement
My sincere thanks to all the people who have contributed to and worked on this start up guide, including translators.
Many thanks especially to jrd, akuna, mimosa and maximus for their contributions in writing and thorough proof-reading.
One application per task rationale
Fully backwards compatible with Slackware
Optimised for desktop usage
With Salix tools to assist system management
High quality package repositories with dependency support
Simple & fully localised system administration tools
Salix artwork
Live CD / USB option
Supports 32-bit and 64-bit architectures
Comes with a complete development environment
For a list of applications available in each Edition, please refer to the later section ("List of Applications")
Salix offers three software installation options: Full, Basic and Core, to meet your demands!
|
Installation Type |
Target Users |
Features |
Examples of Available Applications |
|
Full |
All users |
▫ Graphical environment ▫ Full software installation |
▫ Libreoffice ▫ Exaile ▫ Firefox / Midori ▫ Pidgin |
|
Basic |
Advanced users who would like to add their own choice of applications |
▫ Graphical environment ▫ Minimum selection of software |
▫ Firefox / Midori ▫ Gslapt ▫ Desktop |
|
Core |
Advanced users who would like to run a console system Server maintainers |
▫ No graphical environment ▫ Minimum number of software essential for a console system |
▫ vi |
slapt-get and its graphical interface Gslapt are used for package management, including slapt-src and Sourcery for even wider selection of software to choose from!
A wide range of packages from Slackware, Slackbuild and Salix repositories
The Salix repositories offer dependency resolution support and are the largest third party software package repositories for Slackware offered to date
The Salix repositories are offered for both the 32-bit and 64-bit architectures
DBQUOTELike a bonsai, Salix is small, light & the product of infinite care!DBQUOTE
The latest Salix OS or Salix Live releases are freely and easily available as ISO image files from the Salix OS download page.
An ISO image is an archive file of an optical disc. It can be easily rendered or burned to a DVD or CD by using media authoring or disc burning software. The resulting CD must not contain the .iso file; if it does, you have made a mistake in the process.
It is recommended, if possible, to verify the integrity of your downloaded file by comparing its md5sumfile with the original one uploaded besides the corresponding ISO image file by Salix OS. This ensures that your downloaded image file matches exactly with the one provided on the Salix OS website, and minimises the possibility of installation errors later on.
A Live CD is a CD-ROM holding a self-contained bootable and fully functional operating system. It loads into memory using only the data provided on the CD. It will not modify any operating system or data present on its host computer and will leave no trace after shutdown.
A Live USB flash drive is similar to a Live CD, but it can have the added functionality of automatically and transparently writing changes back to its bootable medium.
Salix Live is the Live CD version of Salix OS. You can therefore safely use it to 'test drive' Salix OS without having to install anything on your computer. You will thus be able to determine whether and to what extent Salix OS is compatible with your particular hardware configuration and if it suits your personal taste.
If you are fully satisfied with your Live experience of Salix OS, you can then proceed to install it with the help of the Salix Live Installer.
Salix Live will also come in handy as a mobile solution if you wish to carry Salix OS everywhere you go, or if you need to perform some basic rescue operation such as fixing an ailing LILO bootloader with Lilo Setup, configuring some partitions with Gparted, etc.
Open the .iso file using a software archiver (file-roller, xarchiver, 7-zip, iso-master, …).
Extract all files and folders (boot, packages and Salix Live) to your USB root directory.
Go to the "boot" directory on the USB key.
If you're running on Unix (Linux, BSD, Mac OS X), just run the file called "install-on-USB.sh". If you're on Windows, just run the file called "install-on-USB.cmd" instead.
Your computer must be set to boot on the optical drive / USB port first before defaulting to the internal hard disk drive.
If that is not the case, you need to first modify the BIOSsetting, usually by pressing the Del key or the F2 key (or some other key combinations depending on your machine). Once in the BIOS, find the "boot menu" or similar and set the order of the boot devices properly, with your optical drive/USB port in the first position. Save your changes and reboot your computer.
Insert the Salix OS (Live)CD/DVD or USB key, and start up your computer.
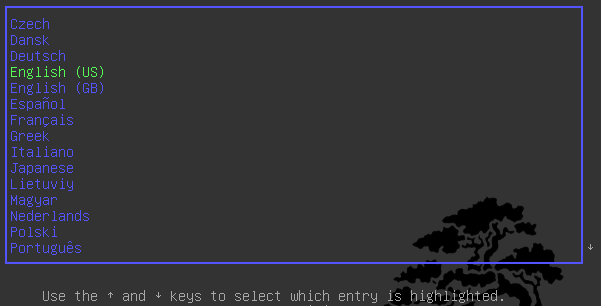
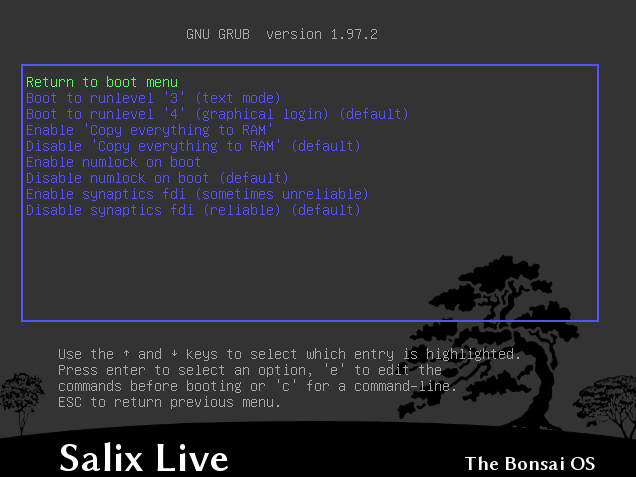
The first screen to greet you will enable you to select your language. Once you have selected your language, simply press on the Enter key to activate your choice.
On the following menu, you will be given the possibility to change your keyboard map if the default one for your language does not suit you.
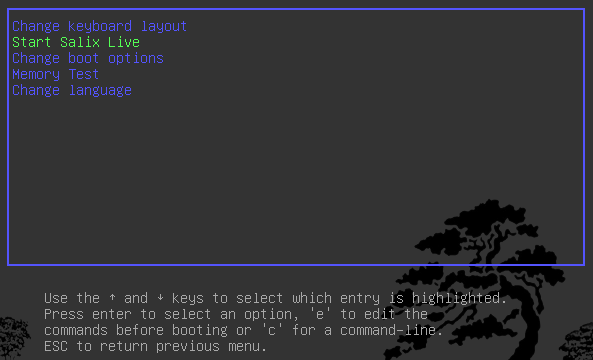
You also have the possibility to modify most default boot settings.
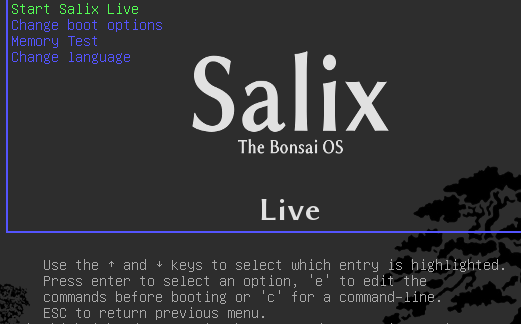
Simply press Enter on the default menu entry: Start Salix Live and a moment later you will see Salix starting up.
For a system wide change, such as installation of an application, you are required to type in the administrator's password (the "root" or "superuser" password). The password for Salix Live is "live" for all the Salix Live editions.
Installing Salix OS on your computer is simple. But before starting, it is wise to check the following points:
Have you backed-up all the important files you have?
Check if your computer comes with Linux-friendly/supported hardware@star
Recommended running specification (Intel PIII 1 GHz, 512 Mb RAM, 8Gb HD space, or equivalent, though a lower spec machine may run without a problem)
At least one separate partition dedicated for Salix on your computer
@star Although it is possible to install Linux on a Mac computer, you have to install a bootcamp software called rEFIt beforehand. Certain file systems, such as xfs, cannot be used with a Mac.
The easiest way to check the compatibility of your computer is to use one of the available Salix OS Live editions.
Before installing Salix (from the live CD or not), you need to have the necessary partition space available on your system, and if the computer does not have a separate partition for Linux, you must create one before installing Salix OS.
It is advisable to back up any important files before modifying the partition table.
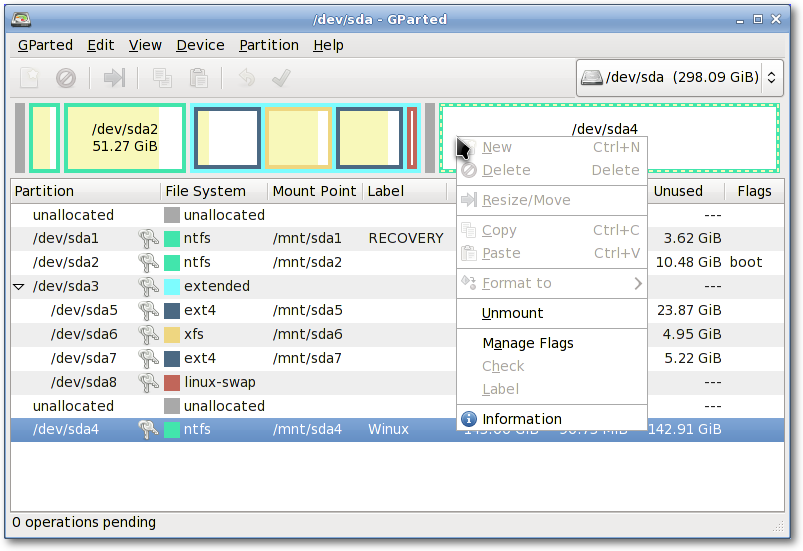
Every Salix Live CD comes with Gparted, which will enable you to change the partition organisation on a disk device while preserving the contents of the partitions. You may with to use this application to create/re-organise your partition table.
Alternatively, if you have an unformatted partition, unallocated disk space, or an existing partition you do not use, you can create or rewrite a new partition table using cfdisk(which comes with the Salix installation CD).
Both applications are simple to use and require no further explanation on how to use them, except for a small comment about "partition types".
A hard drive space can be divided into no more than four "primary" partitions, which can be problematic if you are hosting more than one operating system on the same hard drive. A hard drive can, however, be divided into three "primary" partitions and one "extended" partition. The extended partition can then be subdivided into "logical" partitions and hence overcome the limitation set by the "primary partition" (i.e. no more than four partitions). In practice, there is no difference between a logical and a primary partition except for that "Windows" OS cannot be installed on a logical partition.
Salix needs, at the very minimum, one partition which holds the root directory and must be assigned as "/" (without the quotation marks).
It is highly recommended to have one swap partition. If you already have another Linux OS running on your machine, its swap partition can be shared, and you do not need to create another. A swap partition size is in essence used as an extra RAM to improve the performance of your machine. If, for example, your machine doesn't have a lot of physical RAM or you're performing memory-intensive operations (such as video editing) that use up most or all of the physical RAM. It is normally recommended to have 1.5-2 times the size of your RAM, but for a modern desktop computer with more than a couple Gb of RAM, swap may not be necessary.
It is also highly recommended to have one partition to hold your /home directory, where you can store all your personal data such as documents, photos, customised settings for the desktop environment etc.
It is optional to have one partition to hold the /usr directory, where application files are stored (similar to the "Program Files" directory in Windows or the "/Apps" in Mac OS X).
Optionally you can create one partition to hold the /var directory, where system log files are stored. But unless you are running a server machine, this is probably unnecessary.
An advantage of having more than one partition to hold separate directories is that you can reformat one partition without affecting others. For example, you can re-install Salix on your machine (and this goes to the partition holding the "/" directory) while leaving the partition holding the /home directory intact.
Each partition can be formatted into one of several file systems. Unless you have a particular favourite for a reason, we recommend you format your partitions with the ext4 file system.
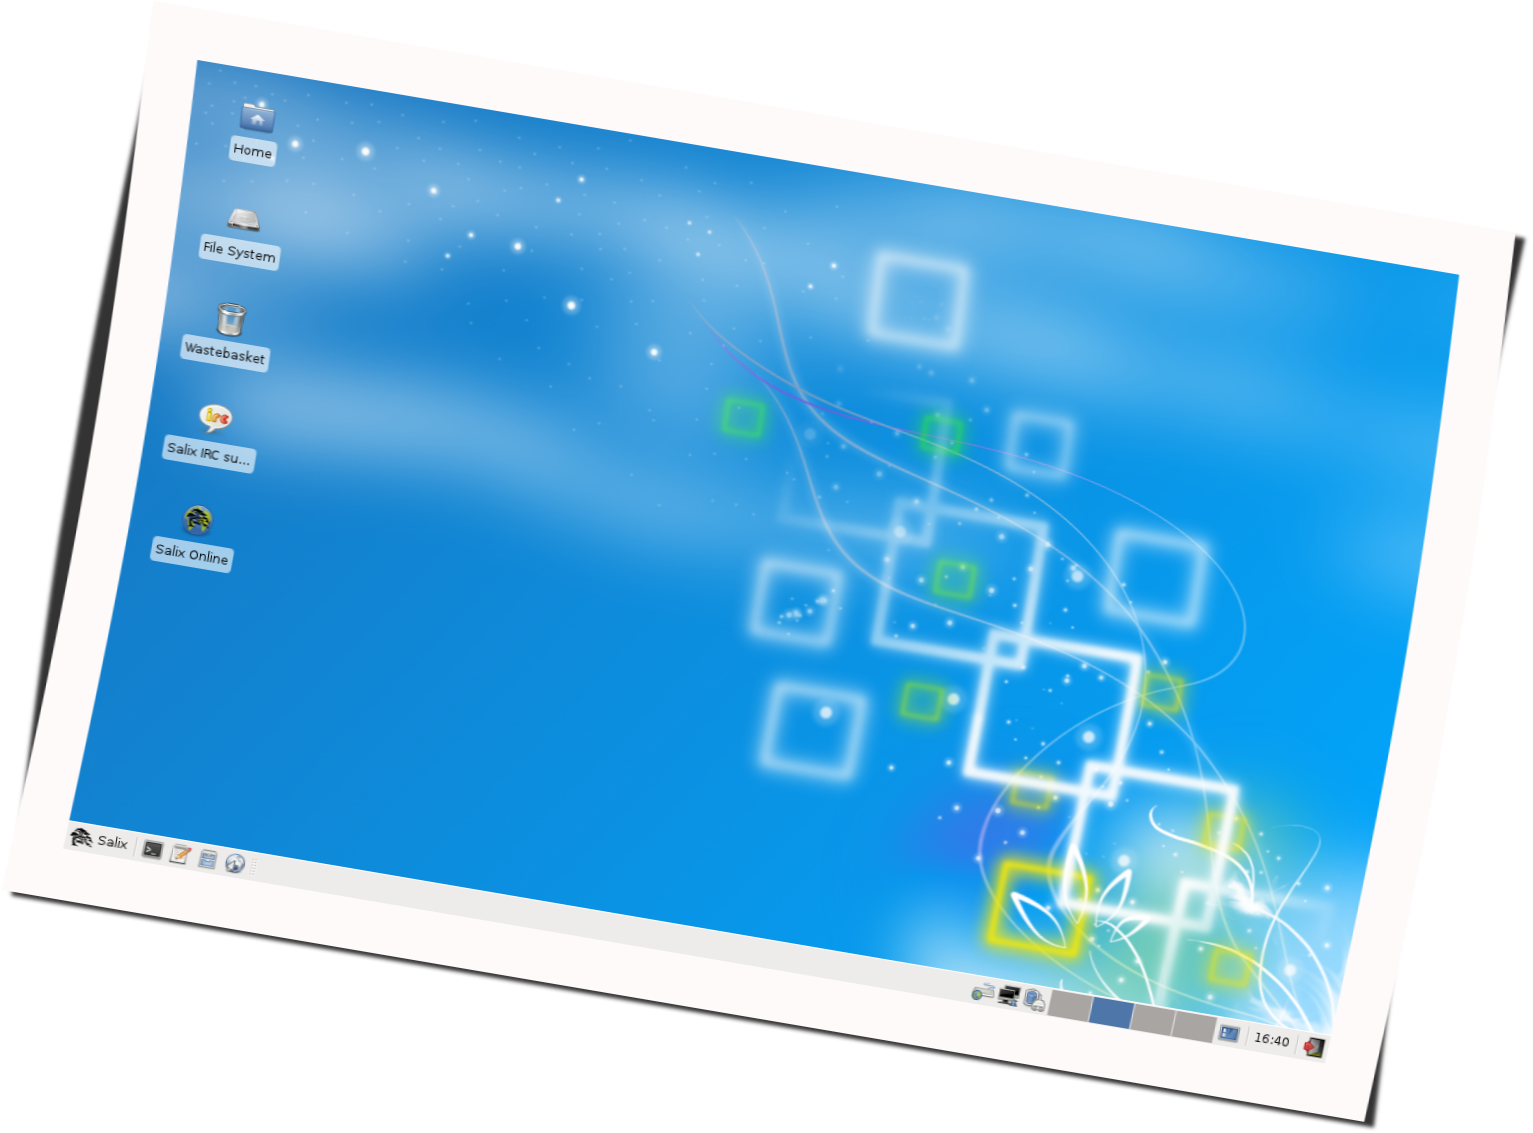
Salix Live Installer is found on the Desktop of every Live CD and is very easy to use. Contextual help triggered by the position of the mouse will be displayed above the application and will guide you every step of the way.
You will be greeted by a reminder that all the necessary partitions have to be created first. As we have seen, this can be done simply with the help of Gparted, which is included in Salix Live and is available directly on the desktop.
![]()
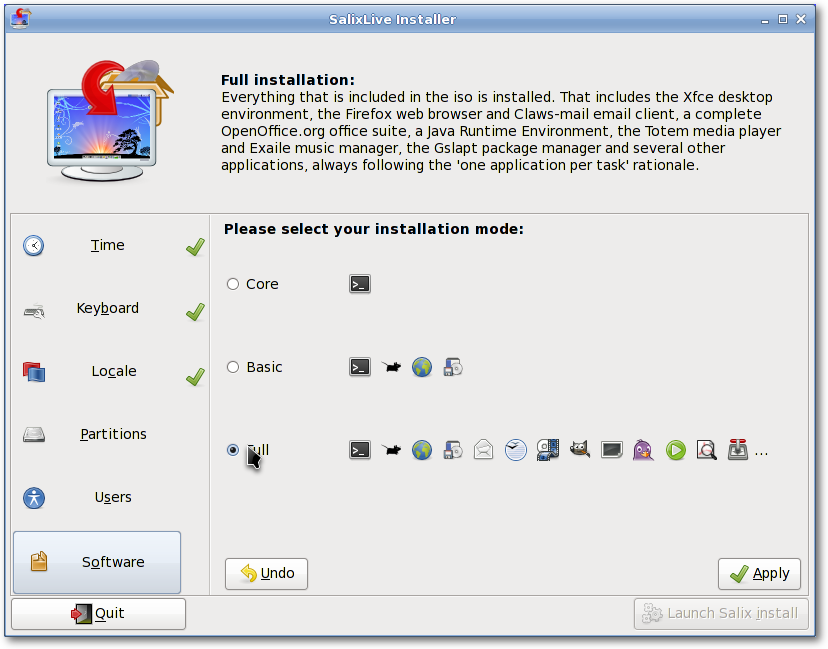
On the left side of the application, you will notice the different sections that must be configured before launching the installation process: Time, Keyboard, Locale, Partitions, Users and Software. Clicking on one of these sections will display the corresponding options that need to be set. As you progress through the configuration process, a check will be displayed beside each completed section. Only when all the sections have been completed will the "Launch Salix Install" button be activated.
So do take the time to familiarise yourself fully with Salix Live Installer. Undo options are available and none of the settings will be applied until you click on the "Launch Salix Install" button.
Remember that the existing swap partition will be automatically used by the Live installer without any prompting on your part.
![]()
Salix comes with three different installation modes. The Full installation mode includes a range of useful applications one could need on a daily basis while following the "one application per task" rationale, while the Basic Mode provides a user with a graphical desktop environment, a web browser and Gslapt package manager.
This is ideal for advanced users who would like to have the basic desktop environment installed first, and then to add their own choice of applications. The Core Mode installs the minimum software essential for a console system to start (i.e. a graphical environment is not provided). This is ideal if you are an experienced user and love to customise your installation for any specific purpose, such as a web server, file server and so on.
Once the installation process is completed, you will be given the choice to launch Lilo Setup to configure your LILO bootloader. Most of the time this is what you will want to do although occasionally, it might be preferable not to, for example if you want to use Grub instead or if you want to simply incorporate Salix into an existing bootloader configuration from another distribution in a multiple boot setup.
Lilo Setup is also very easy to use. Contextual help triggered by the position of the mouse will also be displayed above the application and will guide you every step of the way.
Once Lilo is set up, you are good to go! You can re-start your machine, and start enjoying Salix time.
Installing Salix from a Salix Installation CD is very similar to installing Slackware. Everything will be done efficiently in a semi-graphical command line interface.
Select your keymap.
If you prefer to let Salix do everything including partition management, just select AUTOPARTITION. Note that this will delete everything on the hard drive.
Partition management with cfdisk - you can select the hard drive you would like to modify with the arrow keys and the space key.
You can create a new partition by selecting a free disk space and choosing New. You will be asked to select "primary" partition / "extended" partition first and then set the size. Remember, you can have up to four primary partitions or three primary partition with one extended partition for more partitions. Let's say we want to create one swap partition and partitions for the "/" and "/home" directories.
To create a swap partition, for example, select "primary" partition. Hit enter (for the default starting cylinder), and then type in "+1024M" for 1024 Mb. Choose Type to specify the file system type. Enter 82 (Linux swap).
Let's assume that you have already used up the first three primary partitions, the last one should be made into an "extended" partition as you would still like to create the partitions for "/" and for "/home".
To create an extended partition, select "extended" partition. Hit enter and again hit enter for the default value. This will create an extended partition out of the remaining disk space.
Now select Free disk space from the extended partition, and create New. Create a "logical" partition as you did for the primary partition. Set the size to "+10240M" for roughly 10 Gb. This will be your partition for the root directory ("/"). Select Type, and type "83" (Linux partition).
Create again a new partition and this time, accept all the default selections. The remaing disk space will be put in this partition. This will be your partition for the "/home" directory. Select Type, and type "83".
Select Write, and then Quit to exit the partition management.
Your swap partition will be automatically detected. Say "yes" if the detected partition corresponds to that.
You will then be asked to specify the partition for the root "/" directory. Select the partition you have created for the "/", and continue to format the partition. The ext4 file system is recommended here.
If you have other partitions to mount, you can do so. As we have a partition for a "/home" directory, we select the partition and continue. Unless the partition is new or you would like to erase the content of this partition, select not to format.
Other partitions such as Windows partitions will be detected automatically. If you would like to make those partitions automatically usable during your Salix session, include them all to mount.
The installer will start installing Salix. You will be asked first where the source files are. As you are installing from the CD, select "from the CD". Everything should be detected automatically.
You will be asked to choose an installation mode (Full, Basic or Core).
Installation of packages will start.
After the installation, LILO set up will start up. Unless you are not using LILO, choose the default options.
You will be asked for some other questions regarding time-zone, user name and root password (superuser / administrator password). When all the basic questions are answered, the machine will restart itself.
That's all. The computer is good to go! Enjoy Salix!
Installing Salix OS from a USB key is also possible (but consider installing from a Salix Live USB also). The most difficult part is to know the device name of your USB key. You may wish to issue the command "fdisk -l" as root to know which device is used for your USB key.
Create your USB stick with unetbootin
At Salix installation chose "Install from hard disk"
Enter the device of your USB stick: This probably is /dev/sdb1 if you only have one hard disk. Please note that a Few sticks are mounted by /dev/sdb instead of /dev/sdb1
The next dialog asks where the Salix packages are located on the USB stick. The correct answer here is /salix
Installation should continue normally
After starting up the set up screen, select your keyboard type and exit the setup
Type "mkdir /salix" (without the quotation marks)
Type "mount /dev/sdb /salix" (sdb can be sdb1, depending on the assignment by your machine)
Type setup to restart the installation process
When asked for the source file, select "from a local directory" and type in "/salix/salix"
Installation should continue normally
Installing applications (which roughly equates to "installing packages" as we say in Linux) is a fundamental part of the Linux experience. Superficially it is just an exercise using package managers such as Gslapt and its command line equivalent, slapt-get, for installing packages created by others. Soon you will start to see some packages you are interested in are not in the common repositories, and you will start creating your own packages. For some, this could be the very first time they see their build scripts working in the terminal, checking for configuration errors and chasing after some missing dependencies to compile a program. Some frustration may hit you initially, but then in good time, you will gather enough experience and as you start to see the inner workings of Linux, you will become more confident.
You have to be thesuperuserin order to install an application.
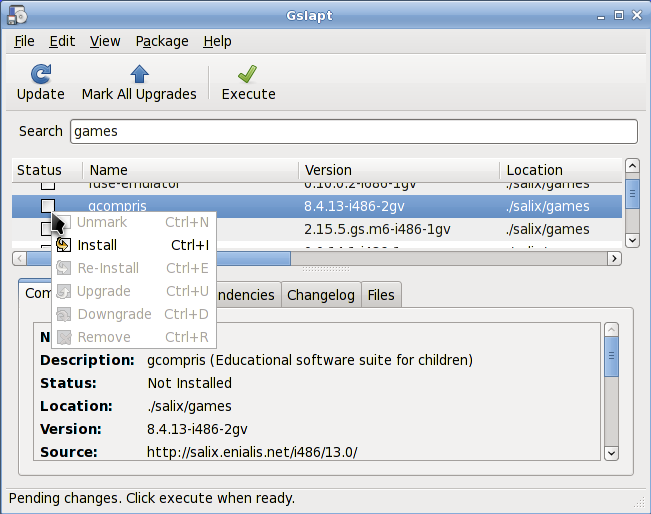
Gslapt is the GUI version of slapt-get. It allows one to search Slackware/Salix mirrors and third party sources for packages. Before use you should first click on the Updatebutton to ensure that the latest updates from the software repositories are known to Gslapt. The search field is there for you to search for a particular package. You can highlight with your left click and choose to install/uninstall/reinstall packages with a right click. Gslapt detects dependencies and will install all the dependency files for a package automatically. Installation/uninstallation/reinstallation will take place once you click on the Executebutton. You can blacklist packages by adding their names to the blacklist found in "Preferences" under "Edit".
slapt-getis a command line tool for Slackware package management. It allows one to search Slackware/Salix mirrors and third party sources for packages, compare them with installed packages, install new packages, or upgrade all installed packages.
To use the application, open a Terminal window and issue the command "slapt-get -u" first to update the package database on your computer. Then "slapt-get -l" to list all the available packages, "slapt-get -search [package name]" to search for a package, and "slapt-get -i [package name]" to install a package. For more command line instructions, please refer to "slapt-get --help".
Here is a little exercise for you. Try installing "w3m" which is a terminal based web browser, by using slapt-get.
Sourcery is a new graphical frontend to slapt-src, a utility to build and install packages from source using SlackBuilds and/or SLKBUILDs. Before use, you should first click on the Updatebutton on the tool bar to ensure that the latest updates from the software repositories are known to Sourcery. The search field is there for you to search for a particular package, and installations, uninstallations or reinstallations of selected packages are done with right clicks on their status boxes.
Installation/uninstallation/reinstallation will take place once you click on the Executebutton.
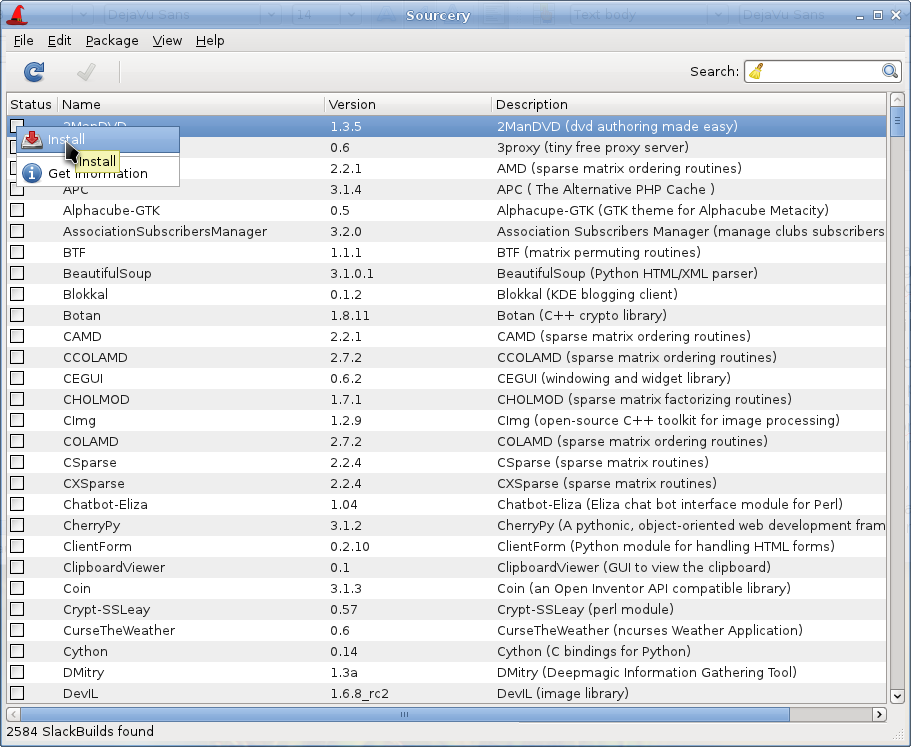
slapt-src is a command line tool that makes the process of downloading and building software packages from slackbuilds.org simple and easy. Slackbuilds.org keeps a large collection of build scripts for extra packages that are still not available from the official Salix / Slackware repositories. Thousands of extra packages are now available to users through this tool.
To use the application, type in "slapt-src -u" first to update on your computer the list of build scripts available from Slackbuild.org. "slapt-src -l" shows you a list of available packages, and as in slapt-get, "slapt-src -i [package name]" will install a package. For more command line instructions, please refer to "slapt-src -help".
Another small exercise for you! Skype is a commonly used software to make voice calls over the Internet. It is not available from the common Salix / Slackware repository, but its build script is available from Slackbuilds.org. Try installing "skype" by using slapt-src. (If you do not wish to install it, you may just want to build the package. Note that the skype is 32-bit only, so if you are running a 64-bit system, please try out some other application).
An alternative way to install a package (which for Salix and many other slackware based distribution ends with the .tgz, .tlz or .txz extension) is to use the command line input "spkg -i [exact name of a package]". This is a handy way of installing a package if you have just created your own package or if you have downloaded it from the Internet. Note that the name of the package must be exact to the last extension (as in xxxxx-i486-tt.txz).
Removing a package is somewhat similar. You can remove a package by issuing "spkg -d [software name]", e.g. "spkg -d skype".
Installing a software from a source file is in most cases not difficult. You can compile a lot of software generally with the following commands.
unpack a source file, move inside the folder
type in "./configure" on the terminal
type in "make"
type in "su"
type your root password
type in "make install"
(Make sure to read accompanying files such as "README", "INSTALL" and so on for installation instructions before compiling. These files may list dependency packages which you need to install prior to the configuration. ./configure --helpor ./configure --help=short outputshould also help you with some configuration options).
Although you should manage to install the software after the final command, it is essentially untrackedand neither Gslapt nor slapt-get can see that the software is installed. A better way is to create a Salix package using SLKBUILD, which is a build script you can prepare before issuing "slkbuild -X" to create a Salix compatible package. For more on SLKBULD, please consult SLKBUILD.
Although the vast majority of packages found in the Salix repositories are complementary to the Slackware repositories, you will find that some packages are present both in the Salix repositories and in the Slackware repositories. These packages have been rebuilt for Salix OS for a number of good reasons, and a list of the packages as well as brief explanations as to why are found in this wiki entry.
If you wish to upgrade an older version of Salix OS on your machine to the latest, please refer to the following link for upgrading your Salix OS.
Network connections are managed by Wicd in Salix. It is an open source wired and wireless network manager for Linux which aims to provide a simple interface to connect to networks with a wide variety of settings.
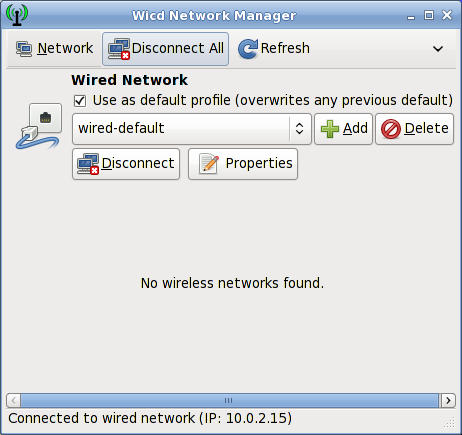
It will connect to wired (Ethernet only, no PPPoE/DSL support yet) and wireless networks.
Note that wicdand wirelessmust be activated in the startup services in order to make wireless networks visible on Wicd.
After writing a document, transferring photos from your camera, or creating your own images with GIMP, you would probably like to print them out with your printer. To do this, you need to have a printer already installed on your system. "Manage Printing", which is found under "System" in the main application menu, handles the installation and general management of your printers. (Ensure that "CUPS" is enabled in the startup services, or Manage Printing will not start properly).
If you are buying a new printer, it is recommended to check the availability of Linux drivers beforehand from the Open Printing database(or search on the Internet). Some companies offer printer drivers for Linux, but this is less common than desired, and often involves a lengthy installation process. For most Linux friendly printers, you have to install drivers such as gutenprint and HPIJS, both of which are available from the repositories.
Select "Add Printers and Classes"
Under "Printers", select "Add Printer"
Enter "root" as a username and your superuser password
Select your printer description and choose if you would like to share the printer
Select the correct driver from the list (Model) - see an example below. This is the important part. Or if you have a PPD file instead, you can load it here.
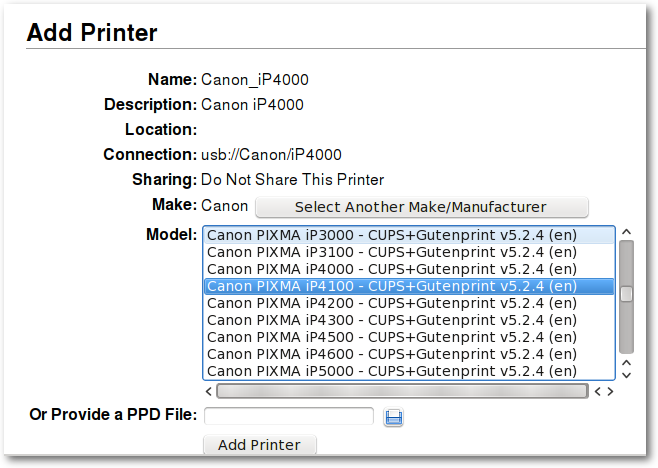
Select Add Printer, and finish the process by configuring details of the printer.
Now the printer should be usable on your computer
For setting up a network printer, please consult the Salix wiki.
Salix only includes, by default, software that are legally free to use in any country, and that means that proprietary media formats are not configured "out of the box". Most commercial DVDs are encrypted, and that means that you need to install certain codecs to view them. This is legally permitted in most countries but not all. Please check and obtain legal advice if you are unsure whether a particular legal restriction applies to a media format and/or packages you wish to use in your country.
Salix codecs installer can be found under "Multimedia" in the main application menu, and conveniently install those codecs to enhance your viewing experiences.
For more information on what is actually installed, please see here.
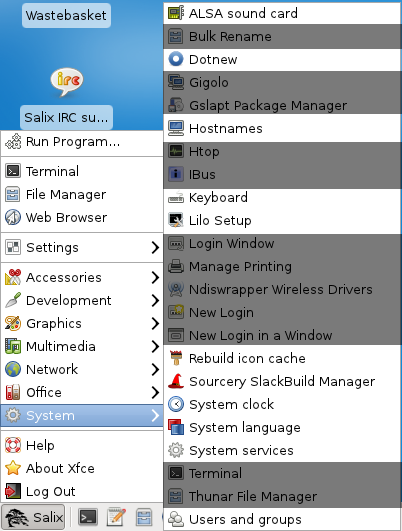
Salix tools are a collection of utilities that are designed to manage every aspect of Salix configuration easily. You can find these tools under the System section of the application menu. Of course, system management in Salix OS can also be done the usual (manual) Slackware way.
Please note that most Salix tools (except Lilo Setup) have an ncurses counterpart which can be used in a non-graphical environment (runlevel 3).
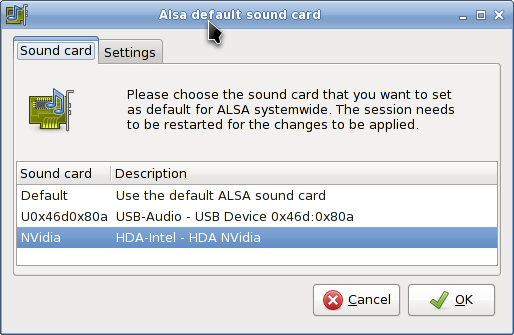
ALSA Sound Card manages the system sound card configuration. It will display available sound cards in your system and let you select the card you want to use in preference. This is particularly useful when you have multiple sound cards in your system, and you would like to assign a sound card for your system other than the one automatically picked during installation/start-up.
As the name indicates, Rebuild Icon Cache reconnects some icons that may have become lost after updating your system / installing some new program, and makes them appear again in the application menu.
Hostnames manages the host names used by your computer. This tool facilitates defining / overviewing host names used while setting up your machine as a server.
Dotnew manages the system configuration upgrades used by Slackware. It will display a possible course of action for each new configuration file found in the system.
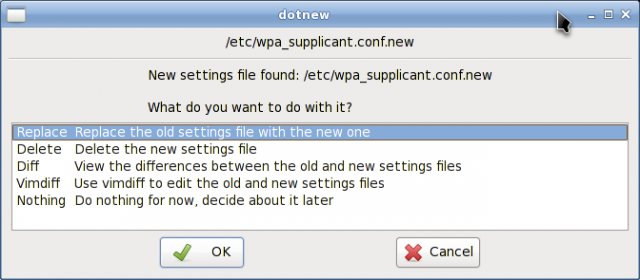
To execute this utility in runlevel 3, simply type dotnew.
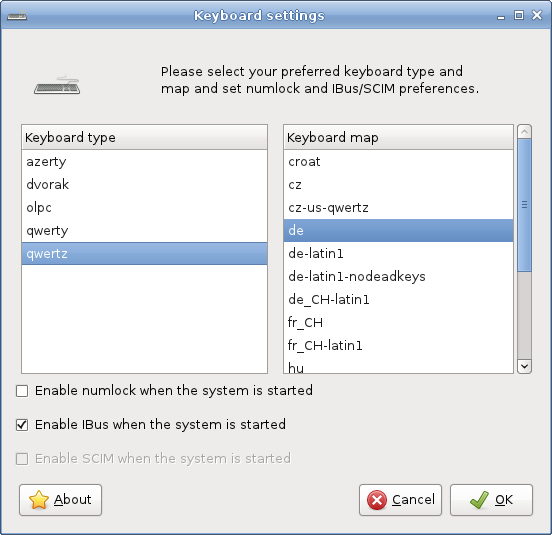
This utility will configure the keyboard disposition being used both in the graphical and non-graphical environments. Modifications are applied instantly.
Note that if you would like to activate Ibus during the start up, you can do so by ticking the optional box.
To execute this utility in runlevel 3, simply type keyboardsetup.
Lilo Setup will install a new LILO bootloader on your computer.
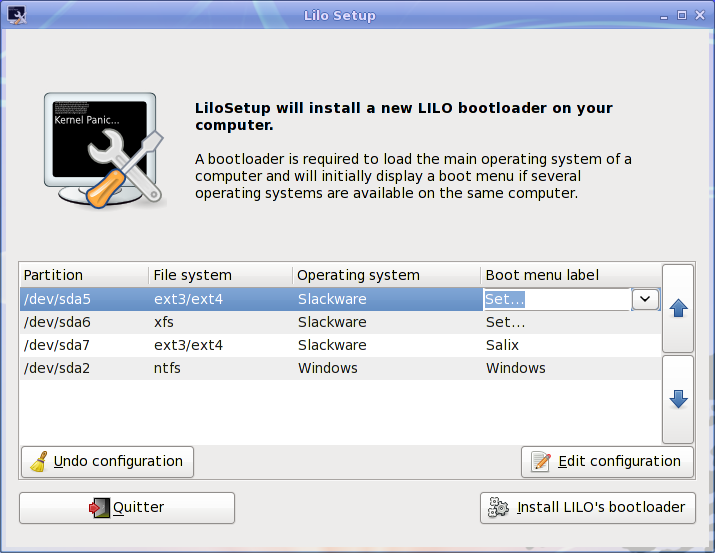
A bootloader is required to load the main operating system of a computer and will initially display a boot menu if several operating systems are available on the same computer.
It is necessary to (re)configure the bootloader each time you install a new operating system on your computer.
Lilo Setup can also be useful in the process of a disaster recovery, in which case you may have to launch it from a Live CD if you have lost all other means to boot into your system.
Here you will be able to select the services that should or shouldn't be activated in the background when your system starts.
All your modifications will be applied instantly if you press on the OK button and will not necessitate a reboot.
To execute this utility in runlevel 3, simply type servicesetup.
![]()
This utility will configure the language of your system.
To execute it in runlevel 3, simply type localesetup.
This utility will configure your computer clock.
To execute it in runlevel 3, simply type clocksetup.
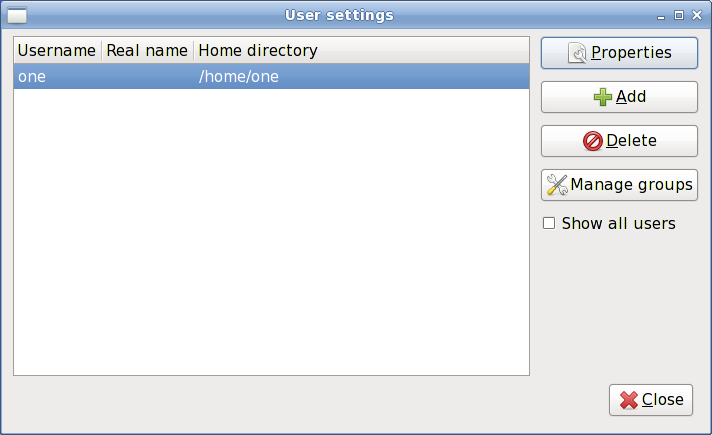
In Unix/Linux, all users and groups of users are given certain permissions and access rights to some part of the system in order to control their ability to access and change it.
This utility manages the creation, deletion and properties of all the system users and groups of users.
To execute it in runlevel 3, simply type usersetup.

Salix update notifier is a tool that periodically checks for available package updates and informs the user about them with the display of a non-intrusive tray icon, which can be used to launch the upgrade process with Gslapt.
Salix Live comes with all the default softwareincluded in Salix OS.
However, due to its Live nature it also includes some extra utilities which are either needed or simply very useful in a Live session.
Some of the Live Tools are graphical utilities that can be accessed directly on the desktop while some Live Tools, reserved for advanced users, can only be executed from the command line (CLI).
Even if run from a CD/DVD, Salix Live gives you the possibility to save any of your work or modification performed while in a Live session.
To do this however, you must first create a special "persistence file" on your hard drive, which will have a predecided fixed-size and will be formatted as a Linux file system.
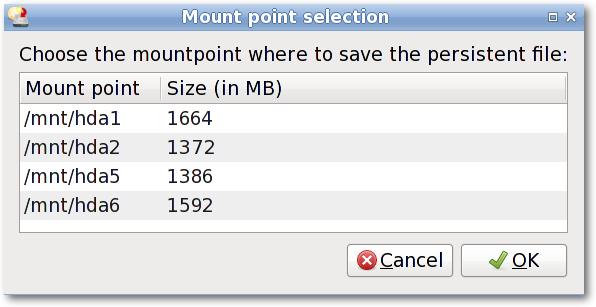
Important!Once this file has been created, it is necessary to reboot the Live CD. From then on, Salix Live will begin to monitor any changes you perform and will record them in the new persistent file.
To remove any changes and come back to the default settings, simply delete the persistent file (slxsave.xfs) from the mount point it was initially created on.
Gparted is included in Salix Live to assist you in managing your partitions if it is necessary for you to do so before performing the installation of Salix OS.
Salix Live Installer will enable you to install Salix OS from the comfort of Salix Live graphical environment.
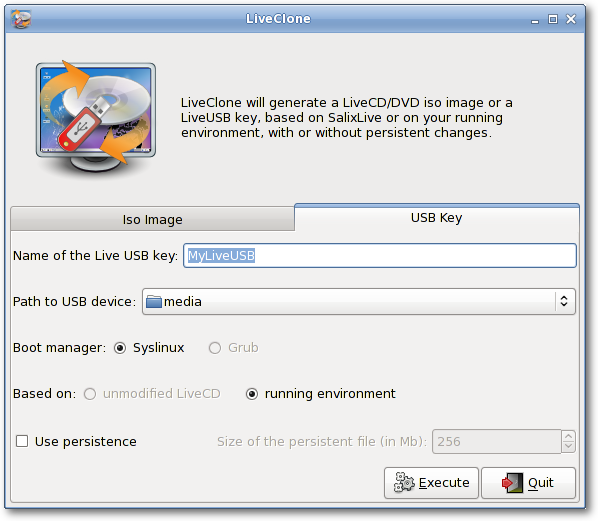
LiveClone generates a Live CD/DVD iso image (which you can burn as an image on a CD/DVD with a CD/DVD burner) or a Live USB key. This means that it creates your customized live environment which will be based either on your SalixLive or your running system. In the case of a Live USB Key generation, you will be offered to make your USB key with "persistence".
Like most Live CDs based on Slackware, Salix Live relies on the Linux Live Scripts technology. Some of the shell scripts it includes will enable an advanced user to fully customize and re-master Salix Live to better suit his or her own needs.
In order to bypass certain limitations or to complement some of the third-party technology it uses, Salix developed its own set of patches and scripts which for the most part need no user interaction while some can be executed, for instance to facilitate the creation of a Salix Live USB Flash Disk.
This section deals with working in a console mode or with a terminal (such as xfce terminal, xterm, konsole and so forth), and serves merely as a light introduction to what we call "command line interface" (CLI). The intended audience here is not seasoned travellers but new journeymen in the land of Linux, who are willing to discover more about what one can do with it. We will go through some examples in this section for you to follow, and hopefully by the end of this walkthrough, you will have no problem working in the "black screen". For those who would like to know more about CLI, there are a couple of useful resources available on the net, and some are listed in the Salix Forum.
So why learn CLI commands at all? Graphical user interfaces for applications have been steadily improving in Linux, and are probably now comparable to any OS in their ease of use. On the other hand, where Linux excels in particular is in the area of command line applications, its traditional strength. Without the CLI, you would be effectively missing out on half of what Linux can offer, if not more.
There is another reason. From time to time, you might have to work in console. For instance, if the machine fails to start up a graphical desktop environment during booting, then you are more or less forced to fix the problem without GUI.
Of course, there are many other reasons to learn CLI commands, but for now we will start by learning how to move around directories.
First, open up a terminal or move to a console (you can do this by pressing Ctrl+Alt+F2, for example. To get back to the graphical desktop, press Ctrl+Alt+F4, for example. F number keys are used to switch between consoles.)
You should be in your user directory (denoted as "~"), which is normally the same as "/home/your user name" (replace the "your user name" with your own). In Salix, this directory contains "Desktop", "Music", "Documents" and so on. To see its content, type "ls" and press enter. You will see something like this:
![]()
Now to move around directories, we use "cd". If you just type in "cd" and enter, nothing will happen. "cd" must be followed either by a name of a directory which is within the directory you are in or by a full path to the directory you wish to move into. You can also go one directory up by typing "cd .." (be careful, there is a space between cd and ..). Remember on Linux, arguments are separated by spaces. So for now, let's move to the root directory. The root directory is, as the name suggests, the core of your directories - every directory stems from here. Once you wipe out the root directory, you will not see your machine booting up again.
To move to the root DBQUOTE/DBQUOTE, type in DBQUOTEcd /DBQUOTE.
Type in DBQUOTElsDBQUOTE to see the list of files and directories in the directory. You should see something like "tmp/", "usr/", "home/" and so on. OK, not so interesting here. Let us move back to your home directory with "cd /home/your user name".
Now move into the "Music" directory by issuing "cd Music". In fact, you do not have to type to the end. By pressing Tab after the first letter or two, you may complete the rest of the directory name automatically.
You can create a folder by issuing "mkdir name of a new folder". For example, let's say we are going to create a photo folder. "mkdir photo" will place the new folder in the current directory. You can check this by typing "ls".
Next, let's create a log file for the photo folder. "nano" is a command line application for reading and writing texts. To bring up the program, type in "nano".
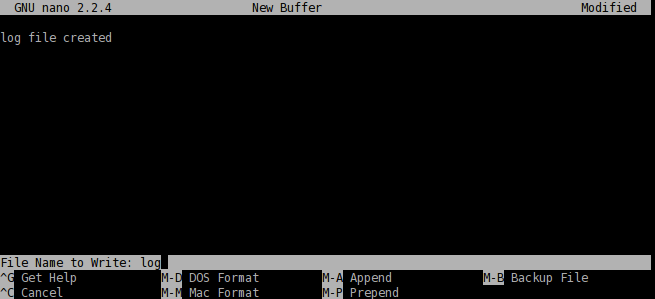
The application is simple to use, and you can see command options shown at the buttom. Type "log file created", and with Ctrl+x, save the document as "log" and quit the application.
DBQUOTEcp" is perhaps one of the most used commands in a console mode. "cp" copies a file or files from one location to another. Since we created the file called "log" and it is currently in the wrong directory, let us move it inside the "photo" directory. You can do so by issuing "cp log photo/" but perhaps it is better to call the log file not just "log" but "log.txt", so that it would be obvious to a Windows user that it is a text file. Type in "cp log photo/log.txt" and enter to execute the command.
You can go inside the "photo" directory and check if the copying has been done properly. "cd photo" and then "ls". The file should be there. Let's add to the log file by saying that it has been moved from "Music" to "photo". Issuing "nano log.txt" will bring up the text. Add a line to say it has been moved, and then save and quit the application by Ctrl+x.
Oh, but we forgot to delete the original "log" file in the "Music" folder. Let's just get back to the "Music" directory using "cd .." and remove the "log" file by issuing "rm log". The "rmDBQUOTE command removes a file or files. For example, if you would like to remove all photos with .jpg extension but not with .png, you can issue a command something like: "rm @star.jpg". This will remove all the files with .jpg extension within the directory you are in. Note that the "rm" command will not ask you to confirm your order. It will just carry out your instructions without further ado and once a file is removed, it is deleted forever. You cannot recover it from the recycle bin.
In this example, we used "cp" to copy the log file and then later on deleted it. Normally, this would be done by issuing a "mv" command; "mv log photo/". You can also use the "mv" command to rename a file. Let's say that you did not like the earlier decision to call the log file "log.txt" and you now want to rename it as "log" again. Type in "mv photo/log.txt photo/log" and execute the command. Now the file name has been changed back to "log".
So now you have the folder called "photo" and a log file in the "Music" directory. This is a little strange as we should normally have the folder not in "Music" but in "Pictures". But now you know how to move a file, perhaps the same command will work for moving a folder?
But... "cp photo ../Pictures" (remember that .. refers to the folder one level up) will give an error like this.
![]()
Let's see what we can do here. The first thing when encountering such a problem is to check the corresponding help file. This can normally be done by issuing a command with an option like "cp --help". It is possible that --help will just be -h, and there may be no help at all. "man" is another command if this is the case. "man cp" will give a more indepth explanation of this command. (To get out of the manual, press "q").
If you read the help carefully, you will see that you need to give an extra option "-r" if you wish to copy a folder to another location. So now "cp -r photo ../Pictures" should copy the "photo" folder inside the correct "Pictures" directory. After checking that the folder has been safely copied, you can remove the "photo" folder from the "Music" directory: "rm -r photo/".
Maybe a little bird has told you that there is a wonderful application called "cowsay" in Linux, and now you would like to see what this program can do.
In order to install a program, one needs to be logged in as root (= superuser = administrator), because it is a system wide action. Alternatively, you can acquire the superuser rights by issuing "su". You will be asked to enter the root password. After providing the correct password, you are now free to do whatever you wish to do on your system (even to make the machine unworkable).
So "cowsay". If this is the first time you are installing an application on Salix, the first thing you should do is to update the package database on your computer by executing "slapt-get -u". Then to search for an application (in this case, "cowsay"), type in "slapt-get --search cowsay". Unfortunately, cowsay is not in the official repositories neither of Salix nor of Slackware. But it is still too early to give up. Slackbuild.org maintains extra packages for Slackware, which of course can be utilised by Salix users.
Search for "cowsay" with slapt-src by typing "slapt-src --search cowsay" after first updating the local database with "slapt-src -u". You will see that it is available from Slackbuild.org. To install it, execute "slapt-src -i cowsay". If you are not sure what this "-i" is, you can check it with the --help option. You will see a lot of lines running up the terminal quickly until the application is installed.
Once it is installed, you might want to test it. First get out of the superuser mode by typing "exit". Then type in "cowsay". Nothing happens, and in fact, you will see that you are now in a strange mode that you cannot execute any commands. This is because the application is still running, but as you don't see anything, perhaps it is not running properly. To terminate the process, press "Ctrl+c". You will get back the normal input line back on your terminal.
![]()
So what was going wrong? Check "cowsay" with "-h". You will see that you need to type in a [message]. Try again with "cowsay Hello Salix!DBQUOTE
To sum up, we have merely scratched the surface of the power of the command line. The best way to learn more is by using it, but remember to use the help tools, and consult online documentation such as that listed in the Salix forum. Linuxcommand.orgcan be particularly recommended if you wish to gain a comprehensive grounding. Proceed cautiously, but don't be afraid to experiment.
A final tip - it can be difficult to copy longer commands accurately. If you select the text with the mouse, in Linux, clicking the middle button or wheel will paste it accurately into the command line or wherever you wish.
Ratpoison is a tiling window manager, somewhat like xmonador scrotwm. Its two main features are that applications fill the whole screen, with no bars or buttons; and the user interface can be controlled entirely from the keyboard, with no mouse. If needed, any number of windows may be shown simultaneously, and rearranged at will - whence the term "tiling" WM. All this may take some getting used to, but although - or perhaps because - the interface is so very different from the conventional point-and-click approach, it can quickly become highly intuitive. Learning which actual keys do what takes far less time than might be imagined. Apart from its efficiency and lack of clutter, ratpoison is a good choice for anyone concerned about RSI (cumulative strain from long-term mouse use), or for netbook users, because "every pixel counts". It is also highly configurable - and fast!
The applications present for the Ratpoison edition aim to fit in with its minimalist (but not spartan) approach. The majority use vim-style keybindings, even though ratpoison itself does not, so users will need to become comfortable with these if they are not already; cheatsheets are available online to help assimilate them, as well as guides (and manpages) for the individual applications. Common operations use only a small subset of keys, which makes the learning curve smoother: for basic browsing, for instance, all you need to get started is page and history navigation and to know how to open links and tabs or windows. Other functions can be learned by exploration at your own pace. To begin using Vim itself, try running vimtutorfrom a terminal, and just follow the instructions.
When you boot Salix Ratpoison, there is no graphical login screen: when you log in, you enter the linux terminal. Log in as your normal user (not root) and type startxto start Ratpoison itself.
You should then see the Salix wallpaper, and a message will appear briefly telling you how to view a list of commands. Type Ctrl-t(C-t, in Ratpoison's own notation) then a question mark; pressing any key takes you back to where you were before. There is nothing to see (apart from the beautiful Salix wallpaper)! But it's just as easy to set Ratpoison to work as with any more conventional desktop.
To select an application from the menu, typeC-t r, and use the arrow keys to navigate(Vim's hjklkeys also work). Right arrow (or l) accesses submenus (such as DBQUOTENetwork"), and left arrow (or h) goes back up a level. Right arrow or enter runs the application (if you open one by mistake, don't worry, just type C-t r again - we will see how to close windows and applications later).

Some common options are available directly at the top. The Vimprobable2browser, for instance, can be found under Network but also by just selecting "Browser". Remember to use the keyboard and not the mouse! A third way to open it bypasses the menu altogether: C-t v. You can create more shortcuts like this for applications you use a lot by adding them to the configuration file, which we will look at below.
apvlv, under Accessories, can be used to read pdf documents such as this guide. Also under accessories, 'Unit conversion' starts the console application units, which will convert between a large range of scales, such as time, weight, or currency, including some quite unusual ones.
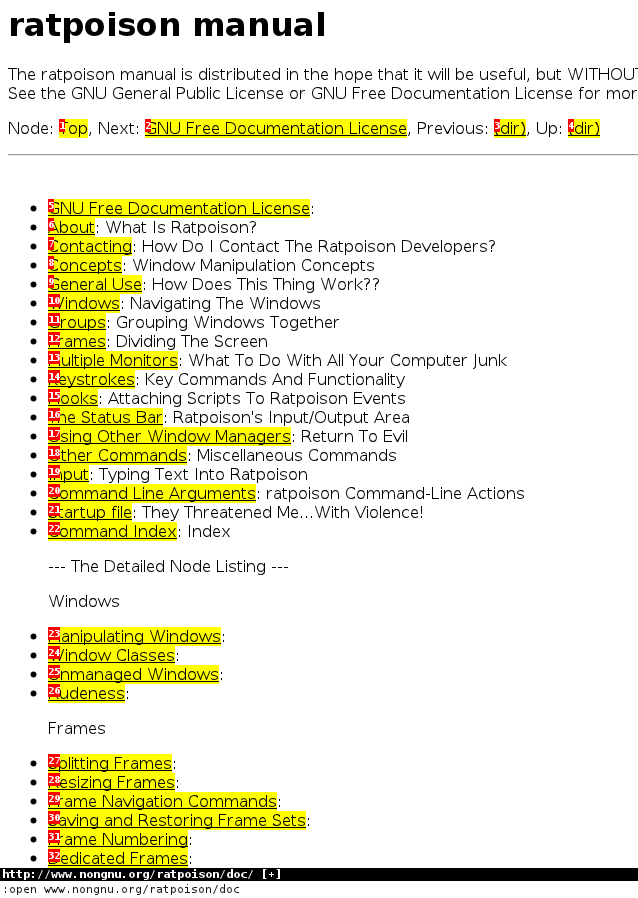
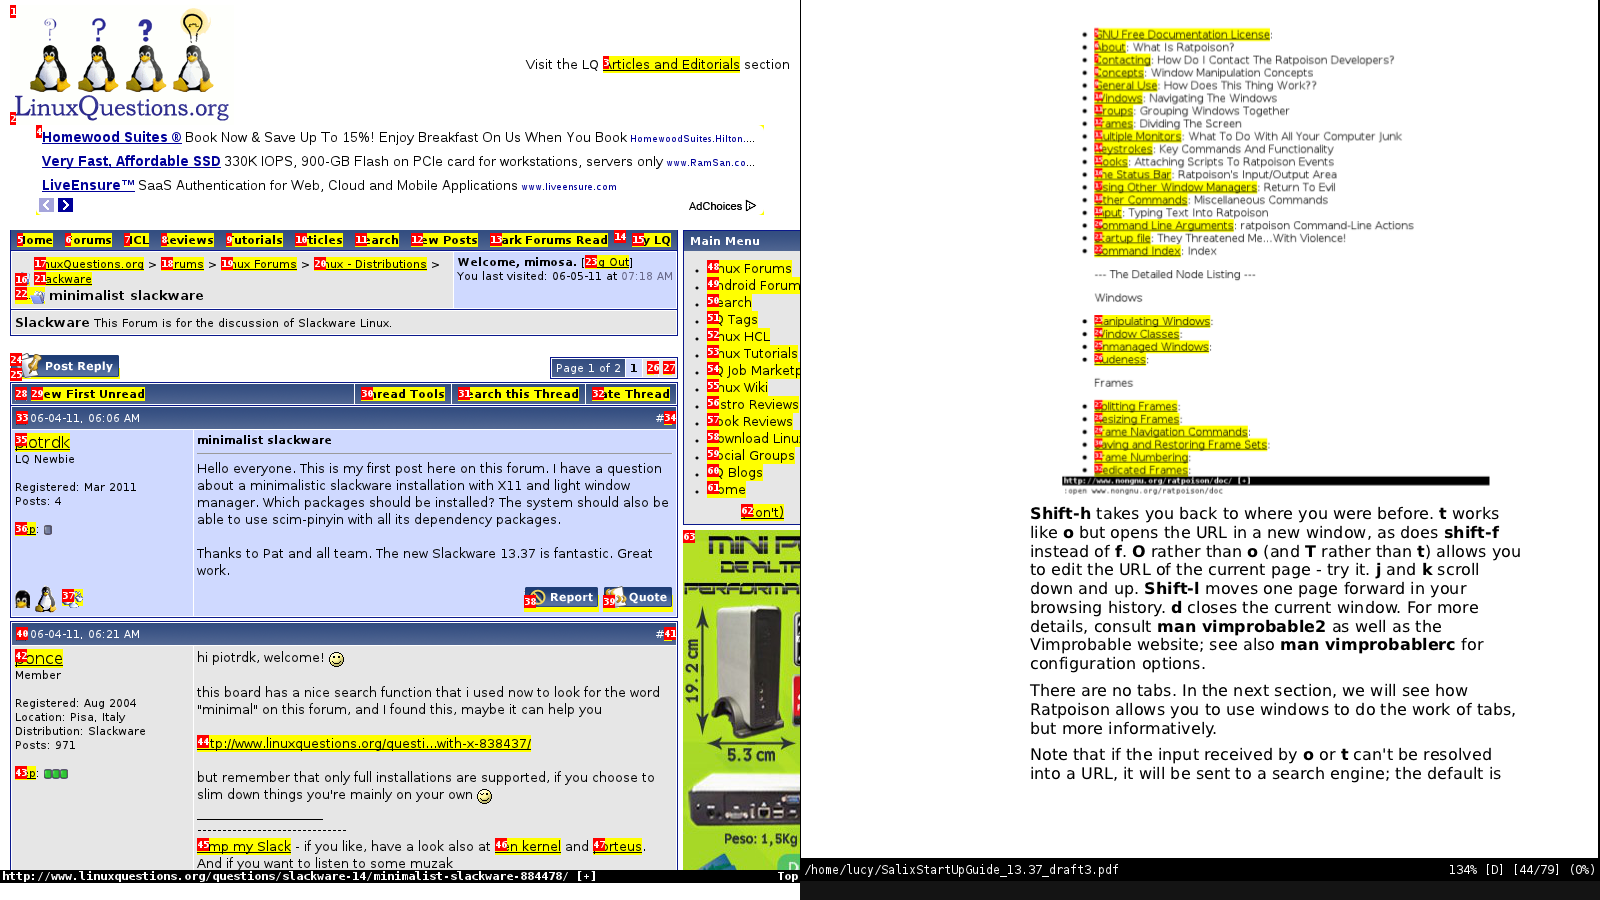
Notice that there are no menus, toolbars, buttons, or scrolling - just a line at the bottom containing the URL. To open a different page, type o, and :openshould appear at the very bottom left of the screen. Type http://www.nongnu.org/ratpoison/doc/. When the page has loaded, type fand then select a number to follow a link:
Shift-htakes you back to where you were before. tworks like obut opens the URL in a new window, as does shift-finstead of f. Pressing TABafter typing the beginning of a URL will suggest completions taken from the history; use TABagain to move through the choices (shift-TABto go back up) and Enterto select. Orather than o(and Trather than t) allows you to edit the URL of the current page - try it. jand kscroll down and up. Shift-lmoves one page forward in your browsing history. dcloses the current window. For more details, consult man vimprobable2 as well as the Vimprobable website; see also man vimprobablerc for configuration options. Note that .and ,are handy alternatives to fand shift-f.
There are no tabs. In the next section, we will see how Ratpoison allows you to use windows to do the work of tabs, but more informatively.
Note that if the input received by oor tcan't be resolved into a URL, it will be sent to a search engine; the default is duckduckgo. If the first item is i, s, w, wd, or y, a different search engine is used in each case. These shorcuts are described in the Vimprobable man page, and may also be customised in the .vimprobablerc configuration file.
To insert data in forms (for instance, login and password) use tab till the cursor is in the right place. Another TABmoves to the next field or link; you may then use ESCto leave insert mode and return to command mode.
If you find your keystrokes are still being interpreted as browser commands, which may happen as a result of the way certain sites are designed, try C-z. The converse problem may arise if you have inadvertently passed keystrokes to oor t; they will appear at the very bottom right of the browser window. To ignore them and return to command mode, clearing the buffer, press ESC.
As described in Vimprobable's man page, it is necessary to create some files for all its features to work: touch ~/.config/vimprobable/historthough some of these may already be present.
Let's now see how ratpoison deals with several open windows. C-t e reveals all of them:
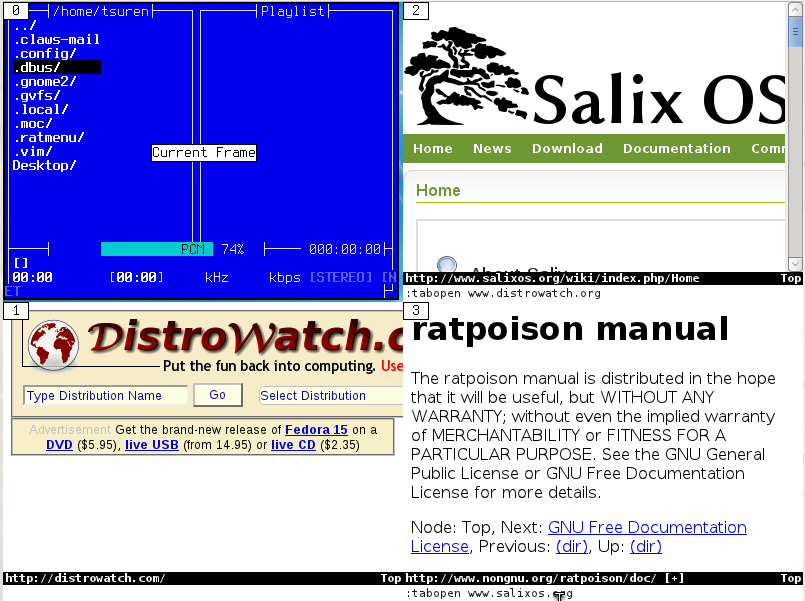
Notice that each one is associated with a number: typing it focuses on that window and hides all the others. (C-t w simply provides a list of open windows.) C-t C-treturns to the previous window. This is very useful indeed for switching rapidly back and forth between two apps - for instance, an editor and a browser - and is an example of how Ratpoison shines ergonomically. C-t kcloses the current window, and C-tshift-kkills the current application. To see a list of commands, type C-t?; for further detail, see also man ratpoisonand the online manual, which we opened above with Vimprobable2.
To work with two or more windows together, Ratpoison allows the user to tile windows. C-t ssplits the screen with the current window above whichever window was last open; C-t Ssplits them horizontally. These steps can be repeated to split the focused window further. C-t TAB (or C-tand an arrow key) moves the focus around, and C-t C-[arrow] swaps the tiled windows over. C-t Q undoes the splitting and allows the currently focused window to fill the screen. In practice, it's rarely useful to have more than one or two windows visible:
To open the command line, type C-t c. There is no automatic package management in the Ratpoison edition, so you will need to make regular manual checks for updates:
$su #change to root
#slapt-get --update #update the package list
#slapt-get --upgrade #upgrade to reflect any changes
Apart from the Vimprobable2browser, the default applications include Muttas the mail client and Gnome Commander as the file manager. Music On Console and Whaaw Media Player are the audio and video players, with GVimas text/code editor. apvlvcan be used to view pdf files. As we have just seen, package management is console-based, using slapt-getand slapt-src. Further options are available in the repository. Firefoxmay be installed adding the pentadactylor vimperatoraddon for mouse-free browsing, or alternatively Jumanji, XXXTermor w3m, a browser for the command line. Thunderbirdcan be used with the Muttatoraddon while Claws-mailworks almost entirely from the keyboard; Alpineis a friendly console email client.
No office suite is included, and in this as in other respects, the user is encouraged to tailor the system by installing their preferred applications. Flash is not included, but is available from the repositories. Screen for managing multiple consoles works well with Ratpoison. Sc is a console-based spreadsheet. For writers, PyRoomis an elegant choice for full-screen, distraction-free writing, and it might be complemented by Antiwordto convert proprietary file formats into plain text.
Note that the Gslaptand Sourcerygraphical package management tools (equivalent to slapt-getand slapt-src) may also be used mouse-lessly, though this is perhaps more awkward than working on the command line. In either case, regular manual upgrading will still be necessary.
As an example, we will install Alpine, derived from the classic Pinemail client.
#slapt-get -u
#slapt-get -i alpine
Note: To see how to edit Alpine's configuration file to access mail from one popular provider via smtp, see the page in the Salix wiki.
For Mutt, see this wiki entry.
After using Alpinea little, one problem may become apparent. Its shortcut for selecting a file, for example to attach it, is C-t. But that's Ratpoison's escape key combination! In fact, Ratpoison has a solution for such conflicts, referred to somewhat cryptically in the shortcut list as meta: C-t tshould send C-tto the application in the active window. However, this does not work in the terminal, which does not recognise the character if it receives it in this form.
Everything in Ratpoison is configurable, and the C-tcombination itself is no exception. A temporary solution is to reassign the binding using Ratpoison's command input feature. C-t : conjures up an input line at the top right of the screen. This can be used for passing instructions to Ratpoison. For instance, one way of opening an application in a new console is:
:exec xterm -e alpine
(that is, C-t : exec xterm -e alpine) which starts the program we just installed. The colon command can be used to pass a number of instructions to Ratpoison; see man Ratpoisonfor a full list together with shortcuts where they have been defined. In fact, there is a shortcut for exec. Just type C-t ! [application]; C-t C-!opens it in a console.
To change the C-tdefault, do: :escape Super_L.
which is the so-called "Windows key" to the left of the keyboard. As well as resolving the conflict with Alpine, this has the great benefit of being just one keystroke. Some functions may not work correctly, in particular the very useful C-t C-t to go back to where you just were, and performance varies from one keyboard to another, so it's worth experimenting. Another possibility is the "Menu" key. To return to the default: :escape C-t.
To make such a change permanent, edit ~/.ratpoisonrc. If you are using Ratpoison, you can open the file now (with GVimor Vim) and tile it horizontally with the window where you are reading this guide (C-t shift-s). Let's go through some items in the file.
![]()
banishsends the mouse pointer to bottom right (incidentally, you may wish to install unclutter, which makes it fade out altogether after a few seconds' stillness; place the line unclutter & in your ~/.xinitrcto run it automatically when X is started). We've seen all but one of the custom keybindings in the "bind" statements. To change the wallpaper, point to a different image. The final item sets up workspaces, which we'll look at next - including C-t W.
Before editing the file, create a backup copy in case anything goes wrong. To change the C-tdefault, simply add a line :
escape Menu # make sure you test your choice first using ':'
We've seen many of the custom keybindings in the "bind" statements.
The final item, together with the bindings to function keys, sets up workspaces; we'll look at these next - including C-t W.
If you have several terminals open, and various browser windows, and some other applications, the number of windows may become unwieldy. To help with this, Ratpoison allows you to use workspaces. (In the online Ratpoison manual, these are referred to more precisely as "groups".) You might then put all browser windows in one workspace, so that C-t e has the same effect as tabs, but with DBQUOTEthumbnails".
Managing these is roughly analogous to how windows are managed within each workspace. As we saw, C-t e shows all windows in the current workspace; C-t w lists them. C-t W shows four more workspaces, which were set up in the last line of the configuration file. In a console, type rpws help .
![]()
The usage summary you will see may be a little cryptic. Just as "C" means Control, "M" refers to Alt. Use Alt with the function keys to access each workspace. Ctrl-Alt and the arrows move up and down workspaces. The remaining options move the current window to a different workspace.
The directory ~/.ratmenucontains the main menu file menu.sh, and the submenus it calls; all these are editable scripts. We will now edit the Network menu using GVim. GVimis in the menu, but try calling it using the colon (C-t :)
:exec gvim ~/.ratmenu/network.sh
or simply
C-t ! gvim ~/.ratmenu/network.sh.
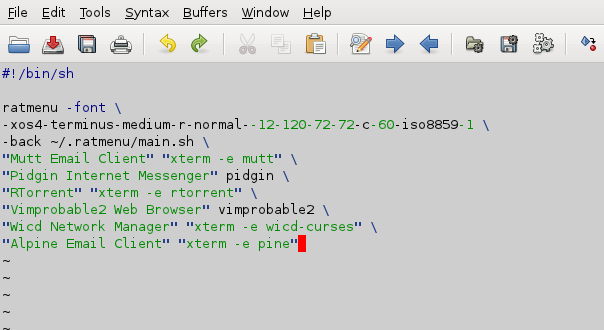
Note that graphical applications are called directly, but command line programs need to be opened inside a terminal.
Use jand kto navigate to where you want to add the entry for Alpine, type ito insert, ESCto return to command mode, and :wqto write and save. Test the change by typing C-t r - the new item should already appear. If all is well, you may close the editor.
Here is a short list of key bindings common to many of the Salix Ratpoison edition's applications.
|
Shortcuts |
Description |
|
gg |
go to the top |
|
G |
go to the bottom |
|
h |
left |
|
j |
down |
|
k |
up |
|
l |
right |
|
TAB |
select form fields, links. C-z to type in some forms |
|
o |
open |
|
t |
open in new tab/window |
|
f |
follow a link |
|
d |
close/delete |
|
H |
go back |
|
/ |
search forwards |
|
? |
search backwards |
|
ESC |
return to command mode (and clear the buffer of any mistyped keystrokes) |
|
: |
pass a non-shortcut command to the application |
For a summary of Ratpoison's own shortcuts, type C-t ? .
While what is covered here should be enough to get you started, many more features of the applications and especially Ratpoison itself are described in online manuals, guides and the manpages. Once you are used to the core features and have them at your fingertips, it's worth digging around further, as well as investigating suitable applications to add to the set. Configuration may be done straightforwardly by editing the files - suggestions may be found online. One of Ratpoison's principal charms is how easily it can be tailored to fit each user's needs and taste.
One miscellaneous item is the mount manager in the System menu, which may also be called from the command line as gmountman. When needed, this deals with the mounting of removable devices, including DVDs. Also, banishmay be called at any time by the shortcut C-t b.
Remember to check frequently for package updates using slapt-get.
Finally, to shut down Ratpoison, there is an entry in the Exit submenu, from where it is also possible to reboot or shut down the computer.
By selecting 'Change boot options' on the Salix Live Boot menu, you will be offered a choice of supplementary boot options
The instructions below the Salix Live Boot menu will give you access to Salix Live 'manual' advanced Boot options.
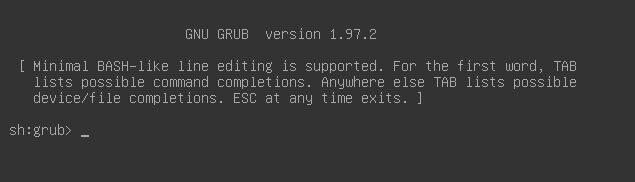
Pressing "c" gives you access to the Grub shell. Type help to view all available commands.
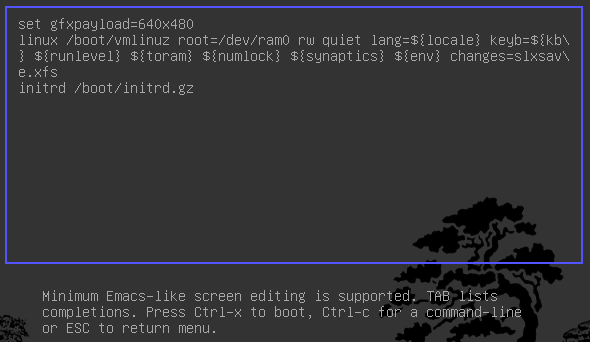
Pressing 'e' while 'Start Salix Live' is selected opens up the following display, enabling you to modify some of the booting options, for example, in order to enter a boot parameter. For instance, "nomodeset" for those who use older graphic cards and have problem booting up properly.
Booting parameters or cheatcodes, are used to manipulate the booting process of Linux. Some of them are specific to Linux Live Scripts while some are common to all Linux versions. To enter a cheatcode, you simply have to add it to the 'linux' line above (after changes=slxsave.xfs), ensuring a blank space separates it from the previous boot parameter.
To load in console only without executing Xorg (runlevel 3)
3
To load Salix Live from a different location than the boot device:
from=/dev/device/salixlive-version.iso
from=path/to/salixlive-version.iso
from=path/to/exploded/salixlive-version.iso
To set root's password to "somepass", or ask for a new password:
passwd=somepass
passwd=ask
To load optional modules from /optional/ directory on the CD:
load=module
(You can use the full module name (module.lzm) or you can skip the extension.)
To safeguard all changes made in a Salix Live session:
changes=file
changes=/dev/device
changes=/dev/device/file
changes=/path/
changes=/path/file
changes=/dev/device/path/
(This cheatcode is already included in Salix Live boot menu and the Persistence Wizard can assist you in creating a persistent file that will be automatically managed by Salix Live.)
To enable debug mode:
debug
(Starts bash several times during boot. Press Ctrl+D to resume booting)
The Linux Live Scripts come with the following useful commands:
Adding/Removing modules on the fly:
/usr/bin/activate
/usr/bin/deactivate
Make a module out of a directory:
/usr/bin/dir2lzm
Explode a module to a directory
/usr/bin/lzm2dir
Make a module out of a package:
/usr/bin/tgz2lzm
/usr/bin/txz2lzm
1. Create a working directory
mkdir -p /mnt/hdxx/directory1
2. Install all software packages using this directory as root:
installpkg --root=/mnt/hdxx/directory1 packagea-x.x.x.txz
installpkg --root=/mnt/hdxx/directory1 packageb-x.x.x.txz
installpkg --root=/mnt/hdxx/directory1 packagec-x.x.x.txz
etc.
3. Remove all unneeded files:
rm -rf /mnt/hdxx/directory1/usr/doc/@star
4. Make any modifications you want:
echo "whatever" > /mnt/hdxx/directory1/foo/bar
5. Build the module:
cd /mnt/hdxx/
dir2lzm directory1 module1.lzm
You can fully customize the content of a module by removing or adding applications and by deleting, editing or adding new files inside it.
1. Create a working directory:
mkdir -p /mnt/hdxx/directoryx
2. Open up the module you want to customize under the working directory:
lzm2dir /mnt/hdc/salixlive/base/modulex.lzm /mnt/hdxx/directoryx
(TIP: You can check that the module contains the unwanted packages by listing the /mnt/hdxx/directoryx/var/log/packages/ directory.)
3. Remove the packages from the working directory:
ROOT=/mnt/hdxx/directoryx removepkg packagex
ROOT=/mnt/hdxx/directoryx removepkg packagey
ROOT=/mnt/hdxx/directoryx removepkg packagez
etc.
4. Install new packages to the working directory:
installpkg --root=/mnt/hdxx/directoryx package1-x.x.x.txz
installpkg --root=/mnt/hdxx/directoryx package2-x.x.x.txz
installpkg --root=/mnt/hdxx/directoryx package3-x.x.x.txz
5. Rebuild the module:
cd /mnt/hdxx/
dir2lzm directoryx modulex.lzm
6. Replace the original module with your new module, rebuild the ISO image and reburn the CD.
By browsing /mnt/live/memory/images/xxx.lzm/, you can view the contents of each module, therefore you'll find which module holds a given package in /mnt/live/memory/images/xxx.lzm/var/log/packages/
Sometimes all you want to do is add a couple files to Salix Live, for example specific configuration files. In that case it is not necessary to create or modify a module.
Salix Live CD holds a /salixlive/rootcopy/ directory. The content of this directory is copied to the root filesystem each time you boot, preserving all directories.
So, for example, if you wish to just use your own xorg.conf file, create etc/X11/ directories inside of /salixlive/rootcopy and store your xorg.conf in it. Note that you need to recreate the full directory hierarchy for the patches to work as desired.
To remaster Salix Live, you could simply use the program Isomaster. You must open an ISO file of Salix Live (for example the one you downloaded) and then add to and/or remove from the modules situated in /salixlive/base, /salixlive/modules or /salixlive/optional. Once you are done, save the modified ISO to your hard drive and use Brasero to burn it on a CD-ROM.
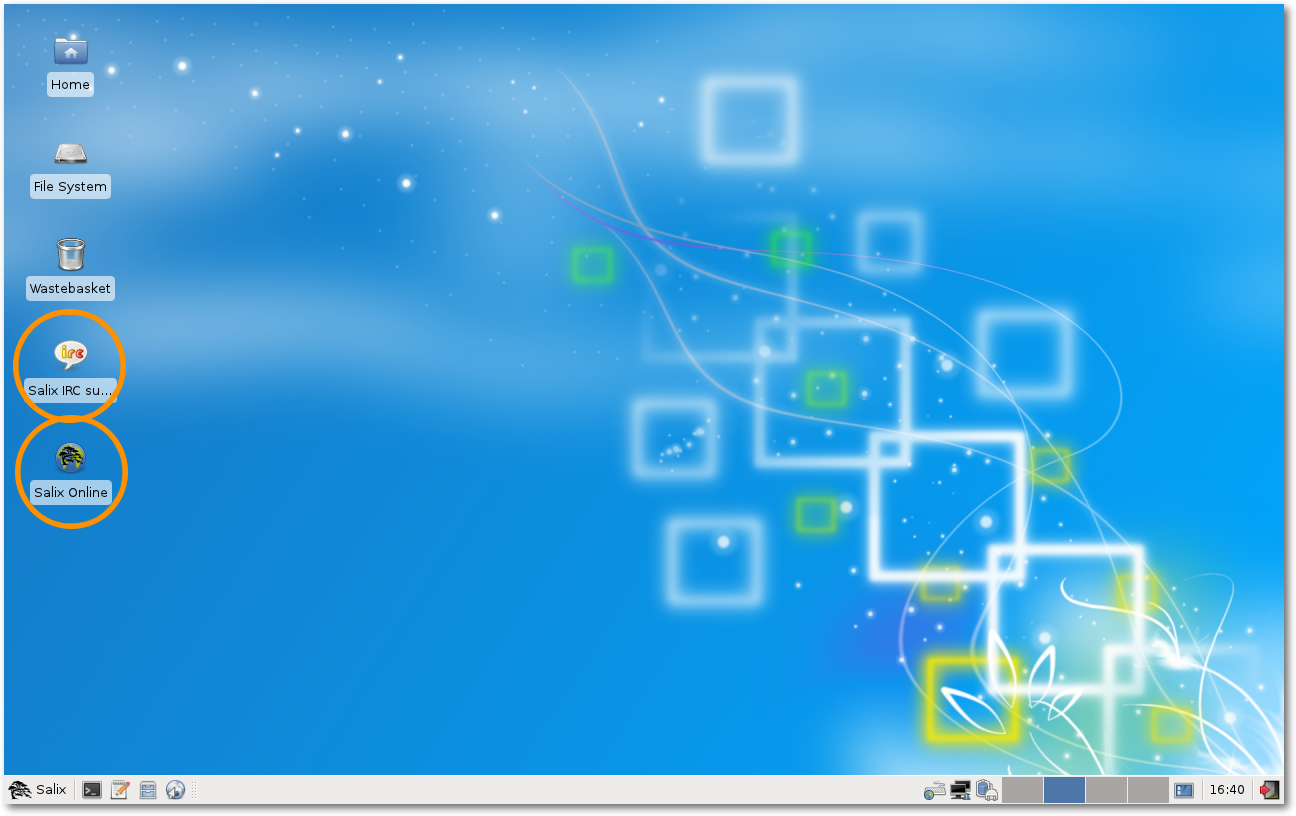
If you are still quite new to either Salix, Slackware or even Linux in general, then you should first of all take some time to study Salix Startup Guide, as it is specifically intended to be accessible to newcomers. The desktop link, Salix Online, will bring you to the Salix Homepage. You could also use the IRC linkabove to be in live communication with members of the community and get instant help if necessary. If you do however, you might want to modify the default qwebircxxxlogin to something more personal and human readable.
We hope that the information here will allow you to get Salix up and running fairly straightforwardly, to begin exploring its potential, and above all to use it for what you want to do. Nonetheless, sometimes you may not know how to do something or be able to make it work.
While Salix aims to be elegant and intuitive, every operating system has its own characteristics, and if you are new to Linux, the sheer fact that it is different means there will inevitably be a process of adaptation (see Linux is Not Windows), even where its very best features are concerned. The only way to climb the learning curve is by trying things out and using them. The more you explore Salix, the quicker you will become familiar with it. However, it is worth emphasising that the default set of applications (they vary depending on the version of Salix you choose, see List of Applications) include many that have a very similar look and feel to those found on other operating systems, such as the office suite LibreOffice, which offers full compatibility with common file formats.
Our Wiki and Forum will be two other important sources of information. The search option of the forum will quickly show you if the question you have in mind has already been posted by a member of the community and if it has been answered. For the same reason, please also search the internet. If you are working on the command line (Working with the Command Line Interface), remember to consult man (and try man salix for a summary of key points specific to this distribution). There are several online forums devoted to Linux, such as www.linuxquestions.org. It should be noted that each forum has its own subculture, and sometimes explicit posting guidelines. If you post a query to a forum, bear Paul Grice's conversational maxims in mind: for instance, be as specific as possible and mention any information you have already found out. To put it another way, remember you are consulting a human community, not an interactive online encyclopedia; it is a conversation, something which can be easily lost sight of online.
Forums are a concrete example of one of the qualities at the heart of Linux, which is that it is community-based. Rather than being a commercial product, in almost all cases it is developed by enthusiasts collaborating together for the sheer delight of making good software. This community extends out into the users of the distribution on its forums. Even if you just want to use core office, multimedia or network applications productively, over time the power that Linux gives users tends to promote self-reliance and an ability to configure and fix their computer setup independently. The same approach underlies the development of Linux as an operating system ̶ where there is room for improvement, someone will dive in and tinker. The cumulative result is that Linux today is highly usable out of the box.
The best way to learn Linux is by using it to the full, finding out in the process how to make it do exactly what you want. After a while, though, it may be helpful to supplement this experience with some more systematic background. As mentioned in the section introducing the command line, the Documentation board on the Salix forums contains a useful post on tutorials and guides. Wherever you find problems recur, it may be worth reading up on the underlying issues over time to gain broader knowledge, especially when it comes to general features of Linux that may be unfamiliar to you, such as file permissions.
Some users may face problems at the very beginning with peripherals or the network. This can seem daunting if you are also adapting to a different operating system at the same time. Explore the options under Menu/System carefully. If difficulties persist, with judicious use of the information and help in the wiki and forums, you should hopefully get the essentials set up as you wish reasonably quickly; then you will be able to take Linux at your own pace.
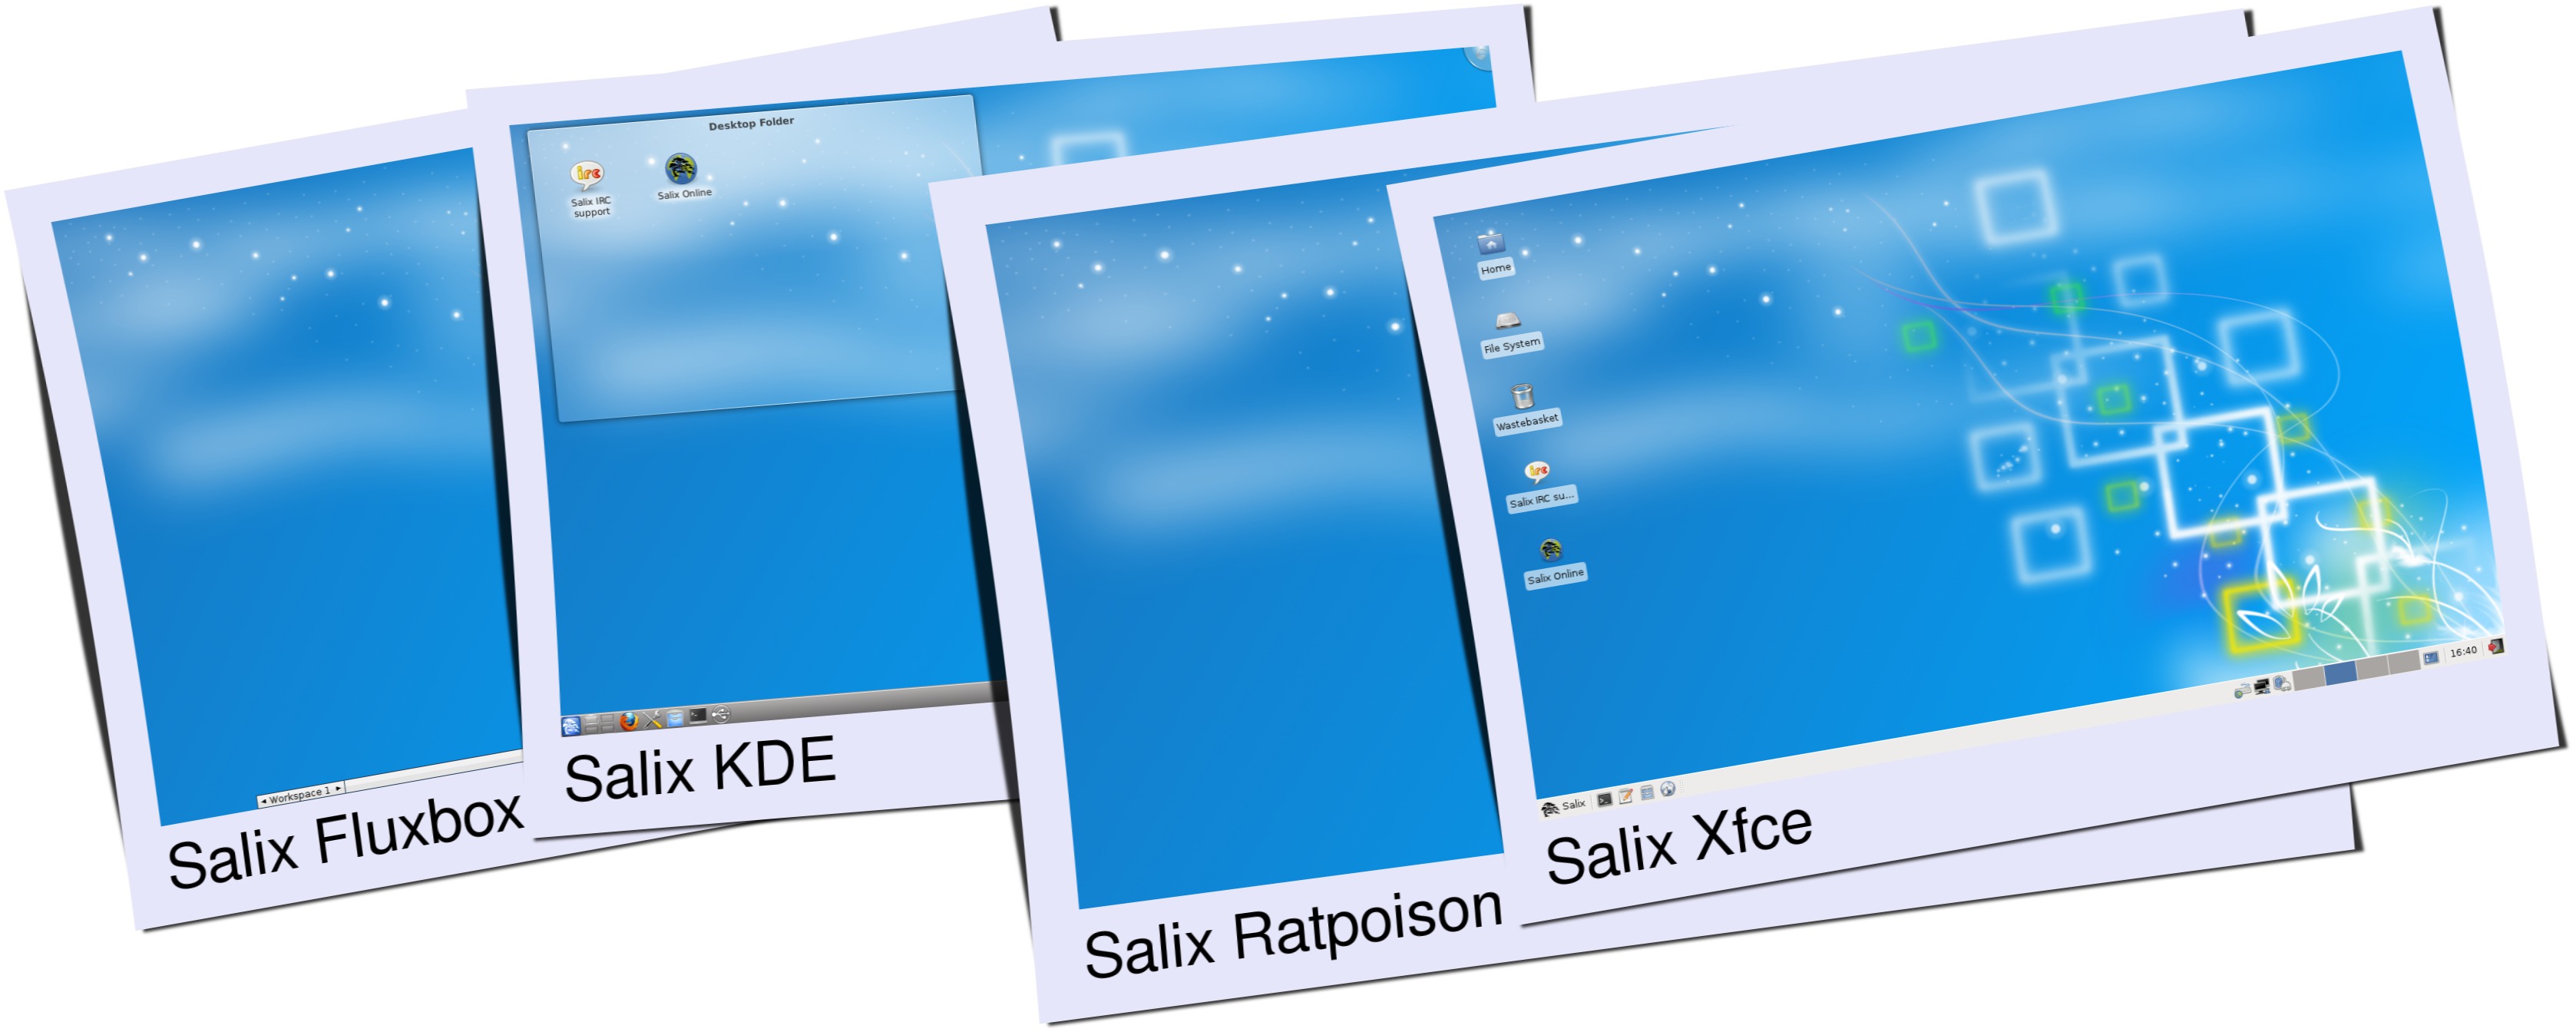
|
Salix Edition |
Xfce |
KDE |
Fluxbox |
LXDE |
Ratpoison |
|
Web Browser |
Firefox |
Firefox |
Firefox |
Midori |
Vimprobable2 |
|
Word Processor |
LibreOffice Writer |
KWord |
LibreOffice Writer |
AbiWord |
|
|
Email Client |
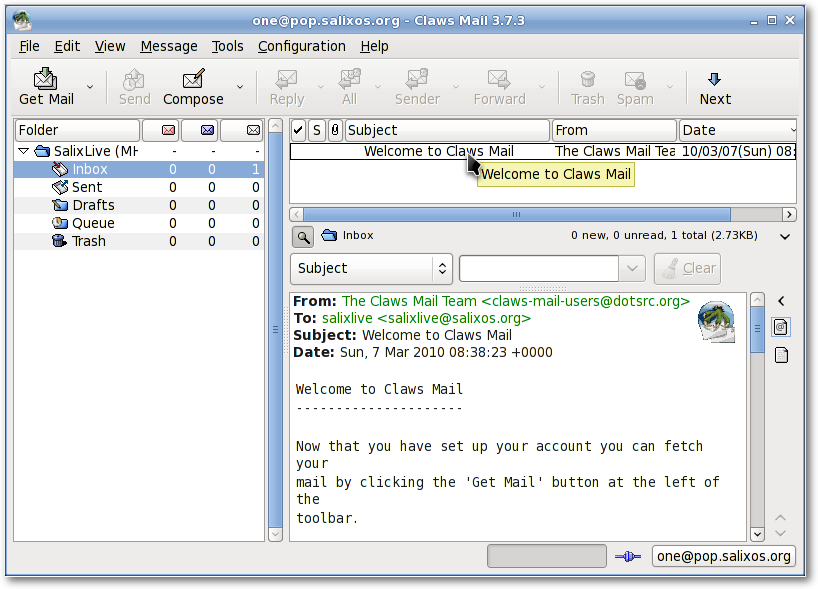
Claws-mail |
KMail |
Claws-mail |
Claws-mail |
Mutt |
|
Picture Viewer |
Viewnior |
Gwenview |
Viewnior |
Viewnior |
Viewnior |
|
Image Editing |
GIMP |
Krita KolorPaint Karbon14 |
GIMP |
mtPaint |
- |
|
Video Editing |
PiTiVi |
- |
- |
- |
- |
|
File Manager |
Thunar |
Dolphin |
PCMan |
PCMan |
Gnome-commander |
|
Window Manager |
Xfce |
KWin |
Fluxbox |
openbox |
Ratpoison |
|
Instant Messaging |
Pidgin |
Kopete |
Pidgin |
Pidgin |
Pidgin |
|
VoIP |
- |
- |
- |
- |
- |
|
Spreadsheet |
LibreOffice Calc |
KSpread |
LibreOffice Calc |
Gnumeric |
sc |
|
Text Editor |
Mousepad |
KWriter |
Leafpad |
Leafpad |
gvim |
|
Integrated Development Environment |
Geany |
- |
Geany |
Geany |
gvim |
|
Pdf Reader |
Document Viewer (Evince) |
OKular |
Document Viewer (Evince) |
ePDFViewer |
apvlv |
|
Multimedia Player |
Parole Media Player |
Bangarang |
Whaawmp |
Whaawmp |
Whaawmp |
|
Music Player |
Exaile |
Clementine Music Player |
Exaile |
Exaile |
Music On Console |
|
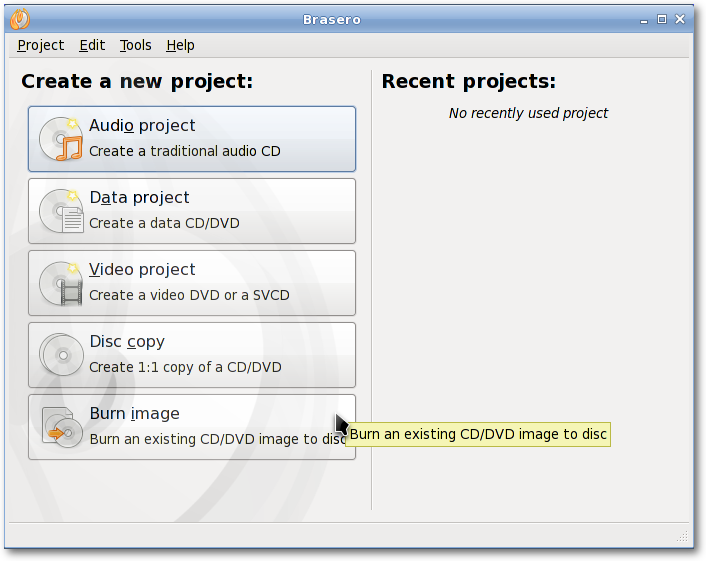
Disk Burner |
Brasero |
K3b |
Brasero |
Brasero |
bashburn |
|
CD Ripper |
Asunder CD Ripper |
K3b |
Asunder CD Ripper |
Asunder CD Ripper |
- |
|
Torrent Client |
Transmission |
KTorrent |
Transmission |
Transmission |
rtorrent |
|
Blogging Client |
- |
Blogilo |
- |
- |
- |
|
Organiser |
Orage |
KOrganizer |
- |
- |
- |
|
PIM |
- |
Akonadi |
- |
- |
- |
|
Desktop Wiki |
zim |
KJots |
- |
- |
- |
|
Multilingual Input |
Ibus |
Ibus |
Ibus |
Ibus |
- |
|
Terminal Emulator |
Xfce Terminal |
Konsole |
urxvt |
LXTerminal |
xterm |
|
Package Management |
Gslapt Sourcery |
Gslapt Sourcery |
Gslapt Sourcery |
Gslapt Sourcery |
Gslapt Sourcery |
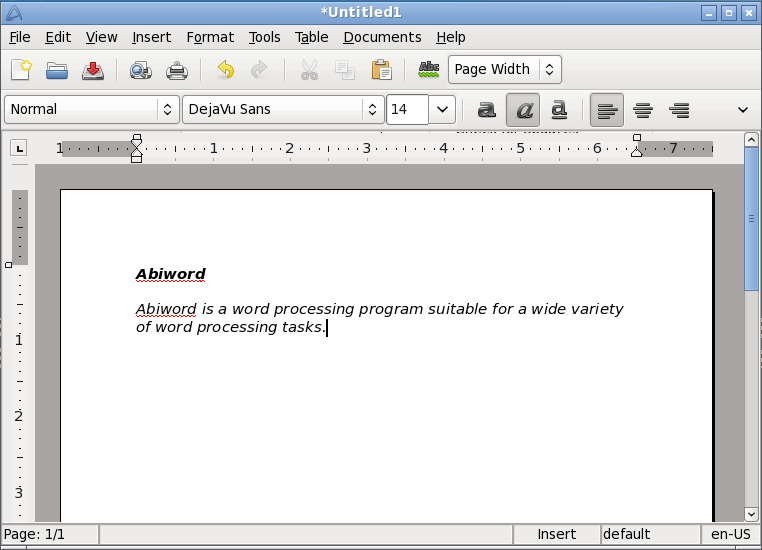
AbiWord is a word processing program suitable for a wide variety of word processing tasks.
![]()
Asunder is an Audio CD ripper and encoder for Linux. You can use Asunder to save tracks from an Audio CD as any of WAV, MP3, OGG, FLAC, WavPack, Musepack, AAC, and Monkey's Audio files.
Brasero is an application to burn CD/DVD. It is designed to be as simple as possible and has some unique features to enable users to create their discs easily and quickly.
Catfish is a handy file searching tool which provides a unified, lightweight and simple interface for different search engines such as find, (s)locate, doodle, tracker and beagle.

Claws Mail is an open source email and news client. It offers easy configuration and an abundance of features. It stores mail in the MH mailbox format as well as the Mbox mailbox format via a plugin.
Document Viewer is a a very lightweight, simple PDF document viewer.
ePDFView is a lightweight PDF document viewer that only uses the GTK+ and Poppler libraries. It opens PDF files, save copies of documents, and has support for printing using CUPS.
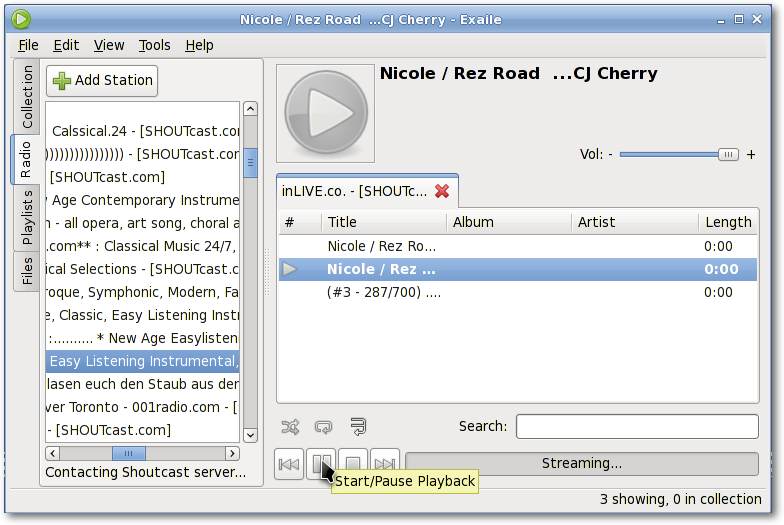
Exaile is a music manager which incorporates automatic fetching of album art, lyrics fetching, Last.fm scrobbling, support for many portable media players, Internet radio such as Shoutcast, tabbed playlists, etc.
File Roller is an archive manager. Supported archive types include gzip, bzip, bzip2, compress, lzop, zip, jar, lha, rar, zoo, arj, 7-zip, etc.
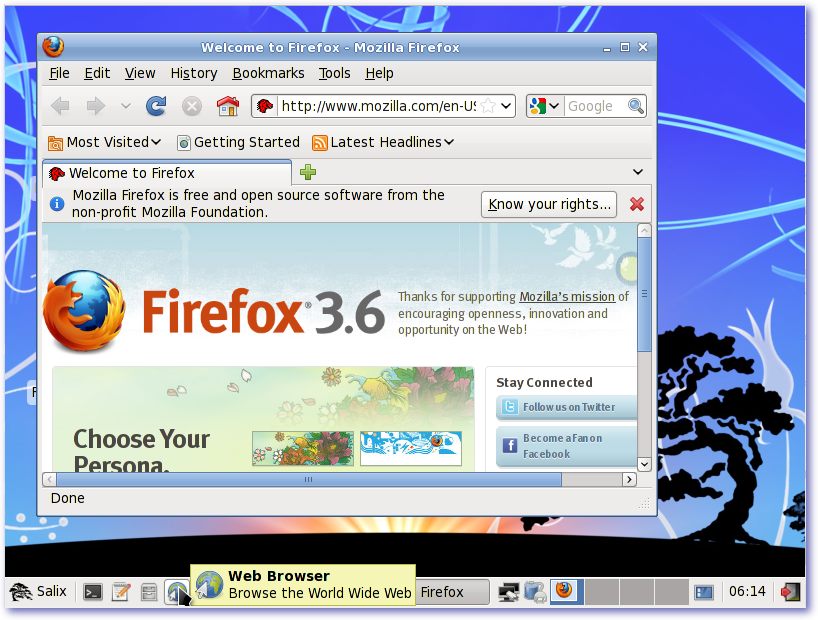
Mozilla Firefox is a free and open source web browser with tabbed browsing, spell checking, incremental find, private browsing and numerous plugins.
Galculator is a calculator featuring two user modes: basic and scientific mode. Basic mode is intended for simple computations while Scientific Mode is Galculator's state of the art.
Geany is a small and lightweight Integrated Development Environment which only has a few dependencies and is independent of any particular Desktop Environment.
gFTP is an FTP client with both a text and a GUI interface. gFTP aims to be simple to use yet powerful.
Gigolo is a frontend to easily manage connections to remote filesystems using GIO/GVfs. It allows you to quickly connect/mount a remote filesystem and browse local networks shares.
GIMP (GNU Image Manipulation Program) is an image retouching and editing tool. In addition to offering free form drawing, it can accomplish essential image workflow steps such as resizing, editing, and cropping photos, combining multiple images, converting between different image formats as well as create basic animated images in GIF.
The goal of Gnumeric is to be the best possible spreadsheet. While not attempting to clone existing applications, Gnumeric can however read files saved with other spreadsheets and offers a customizable feel that attempts to minimize the costs of transition.
GTKMan is a simple manual page viewer. Manual pages are viewed by specifying their name and optionally the section they are in, just as with the original man command. The manual pages are displayed in simple text form using the default system monospace font.
Ibus is a new generation of input method editors after SCIM. It supports for more than thirty languages (Chinese, Japanese, Korean and other languages) on both qt and non-qt environments. (You may have to go to qtconfig and select "ibus" instead of "xim" in "Interface" -> "Default Input Method").
ISO Master is an application for creating and modifying ISO9660 files (ISO images). Its functionalities include: creating an ISO image from scratch, adding or removing files and directories to/from a CD image, and creating bootable CDs using various boot record types.
Leafpad is a very light simple text editor with printing support.
Meld is a visual diff and merge tool. You can compare two or three files and edit them in place (diffs update dynamically). You can compare two or three folders and launch file comparisons. You can browse and view a working copy from popular version control systems such such as CVS, Subversion, Bazaar-ng and Mercurial.
Midori (Japanese for green) is a web browser that aims to be lightweight and fast. It uses the WebKit rendering engine.
Mousepad is a simple text editor with printing support.
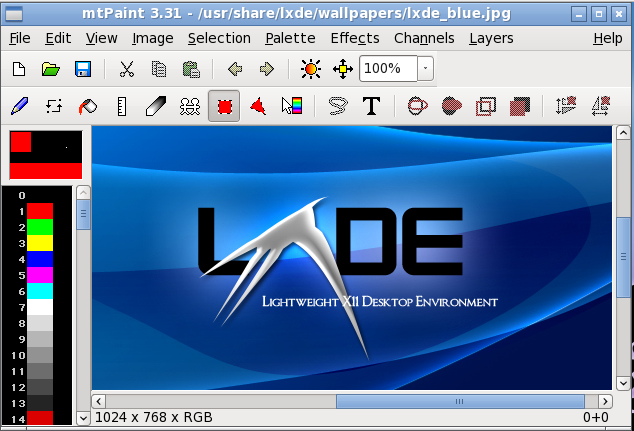
mtPaint is a painting program designed to easily create pixel art and manipulate digital photos. Due to its efficient design it can run on older PC hardware (e.g. a 200MHz CPU and 16MB of free RAM).
LibreOffice is the leading open-source office software suite for word processing, spreadsheets, presentations, graphics, databases and more. It is available in many languages and works on all common computers. It stores all your data in an international open standard format and can also read and write files from other common office software packages.
Orage provides a calendar which integrates nicely into the Xfce Desktop Environment. It is highly configurable and supports alerts based on dates. It warns you with pop up or audible alarms. As it is an application for everyday use, it launches itself in the background and can be accessed using the Orage Clock plugin for the panel. Simply click on a date to display or set the agenda for the day.
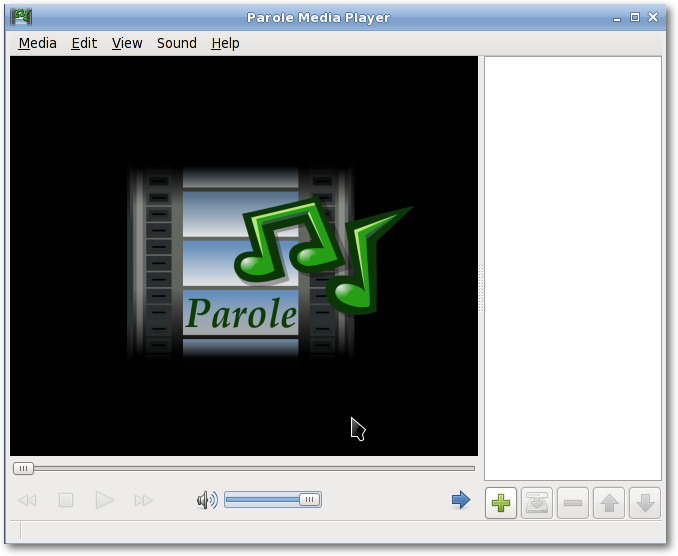
Parole Media Player is a media player (audio and video) which utilises the GStreamer framework for playback.
Pidgin is an easy to use and free chat client which lets you log in to accounts on multiple chat networks simultaneously. Pidgin is compatible with numerous chat networks out of the box: AIM, ICQ, Google Talk, Jabber/XMPP, MSN Messenger, Yahoo, etc.
![]()
PiTiVi is an easy to use video editor. The interface is intuitive to most users. Just by dragging your video clips, you can create your own film clips.
![]()
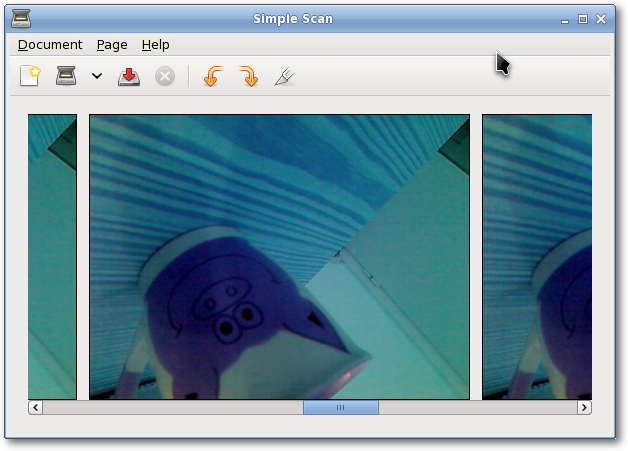
Simple Scan allows you to scan your documents/photos with your scanner or even with your webcam!
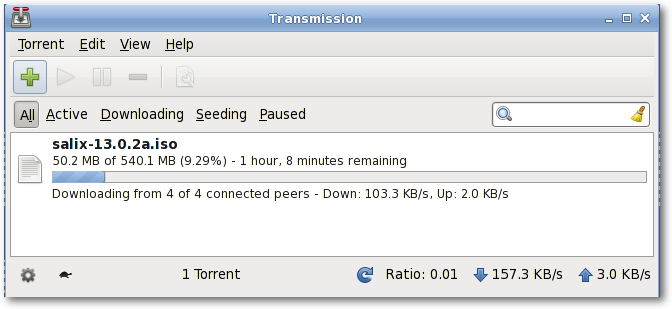
Transmission is a BitTorrent client that is simple, lean and powerful.
Viewnior is a fast and lightweight picture viewer.
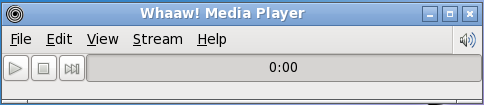
Whaaw! Media Player will play any audio/video files which GStreamer can manage. It supports fullscreen mode, seeking, changing video colour settings and more. It is intended to be a basic media player with few dependencies.
Zim is a bit of everything. In essence, it is a desktop wiki, and it allows you a great deal of flexibility regarding what you can do with it. For instance, one can use it to keep track of TODO lists of ideas, to take notes in a meeting, as a drafting tool for blog entries, mails and so on.