Chapter 4. Salix Mini Walkthroughs
4.1. Working with the Command Line Interface
This section deals with working in a console mode or with a terminal (such as xfce terminal, xterm, konsole and so forth), and serves merely as a light introduction to what we call "command line interface" (CLI). The intended audience here is not seasoned travellers but new journeymen in the land of Linux, who are willing to discover more about what one can do with it. We will go through some examples in this section for you to follow, and hopefully by the end of this walkthrough, you will have no problem working in the “black screen”. For those who would like to know more about CLI, there are a couple of useful resources available on the net, and some are listed in the
Salix Forum.
So why learn CLI commands at all? Graphical user interfaces for applications have been steadily improving in Linux, and are probably now comparable to any OS in their ease of use. On the other hand, where Linux excels in particular is in the area of command line applications, its traditional strength. Without the CLI, you would be effectively missing out on half of what Linux can offer, if not more.
There is another reason. From time to time, you might have to work in console. For instance, if the machine fails to start up a graphical desktop environment during booting, then you are more or less forced to fix the problem without GUI.
Of course, there are many other reasons to learn CLI commands, but for now we will start by learning how to move around directories.
First, open up a terminal or move to a console (you can do this by pressing Ctrl+Alt+F2, for example. To get back to the graphical desktop, press Ctrl+Alt+F4, for example. F number keys are used to switch between consoles.)
4.1.1. Moving Around - cd
You should be in your user directory (denoted as "~"), which is normally the same as "/home/your user name" (replace the “your user name” with your own). In Salix, this directory contains "Desktop", "Music", "Documents" and so on. To see its content, type "ls" and press enter. You will see something like this:
Now to move around directories, we use "cd". If you just type in "cd" and enter, nothing will happen. "cd" must be followed either by a name of a directory which is within the directory you are in or by a full path to the directory you wish to move into. You can also go one directory up by typing "cd .." (be careful, there is a space between cd and ..). Remember on Linux, arguments are separated by spaces. So for now, let's move to the root directory. The root directory is, as the name suggests, the core of your directories - every directory stems from here. Once you wipe out the root directory, you will not see your machine booting up again.
To move to the root "/", type in "cd /".
Type in "ls" to see the list of files and directories in the directory. You should see something like "tmp/", "usr/", "home/" and so on. OK, not so interesting here. Let us move back to your home directory with "cd /home/your user name".
Now move into the "Music" directory by issuing "cd Music". In fact, you do not have to type to the end. By pressing Tab after the first letter or two, you may complete the rest of the directory name automatically.
4.1.2. Creating a Folder - mkdir
You can create a folder by issuing "mkdir name of a new folder". For example, let's say we are going to create a photo folder. "mkdir photo" will place the new folder in the current directory. You can check this by typing "ls".
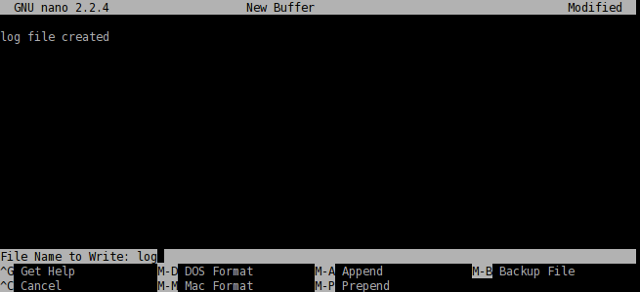
Next, let's create a log file for the photo folder. "nano" is a command line application for reading and writing texts. To bring up the program, type in "nano".
The application is simple to use, and you can see command options shown at the buttom. Type "log file created", and with Ctrl+x, save the document as "log" and quit the application.
4.1.3. Copying & Moving & Removing a File - cp & mv & rm
"cp" is perhaps one of the most used commands in a console mode. "cp" copies a file or files from one location to another. Since we created the file called "log" and it is currently in the wrong directory, let us move it inside the "photo" directory. You can do so by issuing "cp log photo/" but perhaps it is better to call the log file not just "log" but "log.txt", so that it would be obvious to a Windows user that it is a text file. Type in "cp log photo/log.txt" and enter to execute the command.
You can go inside the "photo" directory and check if the copying has been done properly. "cd photo" and then "ls". The file should be there. Let's add to the log file by saying that it has been moved from "Music" to "photo". Issuing "nano log.txt" will bring up the text. Add a line to say it has been moved, and then save and quit the application by Ctrl+x.
Oh, but we forgot to delete the original "log" file in the "Music" folder. Let's just get back to the "Music" directory using "cd .." and remove the "log" file by issuing "rm log". The "rm" command removes a file or files. For example, if you would like to remove all photos with .jpg extension but not with .png, you can issue a command something like: "rm *.jpg". This will remove all the files with .jpg extension within the directory you are in. Note that the "rm" command will not ask you to confirm your order. It will just carry out your instructions without further ado and once a file is removed, it is deleted forever. You cannot recover it from the recycle bin.
In this example, we used "cp" to copy the log file and then later on deleted it. Normally, this would be done by issuing a "mv" command; "mv log photo/". You can also use the "mv" command to rename a file. Let's say that you did not like the earlier decision to call the log file "log.txt" and you now want to rename it as "log" again. Type in "mv photo/log.txt photo/log" and execute the command. Now the file name has been changed back to "log".
4.1.4. Copying & Moving & Removing a Folder - cp & mv & rm
So now you have the folder called "photo" and a log file in the "Music" directory. This is a little strange as we should normally have the folder not in "Music" but in "Pictures". But now you know how to move a file, perhaps the same command will work for moving a folder?
But... "cp photo ../Pictures" (remember that .. refers to the folder one level up) will give an error like this.
Let's see what we can do here. The first thing when encountering such a problem is to check the corresponding help file. This can normally be done by issuing a command with an option like "cp --help". It is possible that --help will just be -h, and there may be no help at all. "man" is another command if this is the case. "man cp" will give a more indepth explanation of this command. (To get out of the manual, press "q").
If you read the help carefully, you will see that you need to give an extra option "-r" if you wish to copy a folder to another location. So now "cp -r photo ../Pictures" should copy the "photo" folder inside the correct "Pictures" directory. After checking that the folder has been safely copied, you can remove the "photo" folder from the "Music" directory: "rm -r photo/".
4.1.5. Installing a Program - slapt-get and slapt-src
Maybe a little bird has told you that there is a wonderful application called "cowsay" in Linux, and now you would like to see what this program can do.
In order to install a program, one needs to be logged in as root (= superuser = administrator), because it is a system wide action. Alternatively, you can acquire the superuser rights by issuing "su". You will be asked to enter the root password. After providing the correct password, you are now free to do whatever you wish to do on your system (even to make the machine unworkable).
So "cowsay". If this is the first time you are installing an application on Salix, the first thing you should do is to update the package database on your computer by executing "slapt-get -u". Then to search for an application (in this case, "cowsay"), type in "slapt-get --search cowsay". Unfortunately, cowsay is not in the official repositories neither of Salix nor of Slackware. But it is still too early to give up. Slackbuild.org maintains extra packages for Slackware, which of course can be utilised by Salix users.
Search for "cowsay" with slapt-src by typing "slapt-src --search cowsay" after first updating the local database with "slapt-src -u". You will see that it is available from Slackbuild.org. To install it, execute "slapt-src -i cowsay". If you are not sure what this "-i" is, you can check it with the --help option. You will see a lot of lines running up the terminal quickly until the application is installed.
Once it is installed, you might want to test it. First get out of the superuser mode by typing "exit". Then type in "cowsay". Nothing happens, and in fact, you will see that you are now in a strange mode that you cannot execute any commands. This is because the application is still running, but as you don't see anything, perhaps it is not running properly. To terminate the process, press "Ctrl+c". You will get back the normal input line back on your terminal.
So what was going wrong? Check "cowsay" with "-h". You will see that you need to type in a [message]. Try again with "cowsay Hello Salix!"
To sum up, we have merely scratched the surface of the power of the command line. The best way to learn more is by using it, but remember to use the help tools, and consult online documentation such as that listed in the Salix forum.
Linuxcommand.org can be particularly recommended if you wish to gain a comprehensive grounding. Proceed cautiously, but don't be afraid to experiment.
A final tip – it can be difficult to copy longer commands accurately. If you select the text with the mouse, in Linux, clicking the middle button or wheel will paste it accurately into the command line or wherever you wish.